Bike trailer available

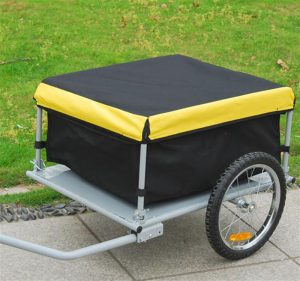
This is just to let everybody know that for those that are working around campus this summer, we have a bike trailer that can be helpful to transport small equipment or a bunch of plants from the lab to the greenhouse, Totem field or anywhere near by. There is also a lock for it and hopefully, and most importantly we will soon have an additional bike apart from the rusty one that Brook kindly donated some time ago. I will keep you updated on that!

Share and enjoy! (make sure to always return it to the lab so it’s available for the rest of us)

Thank you,

Natalia

trailer

Drill, dry, sieve

I wanted to let everyone know about some supplies and equipment that are new in the lab. During the 2015 field season, I bought a couple of things that are now part of the lab general use equipment and supplies. Here they are:

  1. Drill. We now have a nice, battery-powered drill that is really good for drilling things. The drill is in the hardware cupboard near the lab computer. It’s in an orange bag.
  2. Silica Gel. I returned from the field with more than 50 kg of used silica gel. It’s not pristine (was used to dry seeds), but great for field work. It’s stored in sealed, orange buckets in the Lab Extension in Biology (check the tall metal shelves).
  3. Seed Sieves. For processing seeds in Iowa, I bought some seed sieves. These are supposed to be the best ones for wild Helianthus, so if you are processing a lot of seeds, these might be of use. These are also now in the Lab Extension.

Happy drilling, drying, and sieving.

Link to user manual for new, old drying ovens in the Biosci lab.

There are two new-to-the-lab drying ovens in the Biosci lab.  They appear to be older.    They do not have digital displays of the inside temperature.  Neither do they have temperature settings on the dial.  Rather, they have dedicated glass thermometers and temperature settings 1-10.  I just installed a Hobo temperature logger, set to take readings every ten minutes.  I’ll adjust the settings over the next few days to try and get a bead on what those temperature setting numbers on the outside mean.

There is a link above to the drying-oven’s manual, but it is very basic and I didn’t find it to be much help.

September 9, 2015: Follow-up

Regarding the older-model drying ovens (from Velland’s lab).

Center temp reading:

Setting 1: 26 deg. C.

Setting 2: 51 deg. C.

Setting 3: 65 deg. C.

Note, there is a marked discrepancy between readings on the glass thermometers in the oven and the Hobo temp logger upon which the above information is based.  Glass thermometers appear to read a lower temperature than the Hobo logger, up to 10 degrees difference in some cases.  The Hobo used during this trial was new and factory- calibrated.  At least one of the glass thermometers appears to have bubbles in the metering liquid, so may be faulty.

Temperature setting 2: The temp logger was in the center of an empty oven with the vent partially open during readings.  When the vent (located on the top of the unit) was opened and both shelves were filled with damp samples the top shelf appeared to run about 10 degrees cooler than the bottom shelf (according to readings from the glass thermometers).     Filled with damp samples and with the vent fully opened, average temperature for the top shelf was 33 deg. C.  And according to the glass thermometer, the temperature on the bottom shelf was about 43 degrees.  It may be worth noting that these readings were taken from glass thermometers laying directly on metal shelves, whereas the samples themselves were elevated off the metal shelves, somewhat, by their stems and sepals/calyx, and so likely insulated from any quick fluctuations by these things, as they would have been by the surrounding air and enclosing plastic bags.  At the last measurement, bottom shelf samples were warm, but not hot, to the touch.  Also, there was a vigorously living spider moving about in one of the bottom shelf bags.


More on Hydroponics

This post is intended to give a few more details on the hydroponics rigs that I constructed, and am currently testing with Greg O. I built these rigs in collaboration with John Gourlay (jgourlay@mail.ubc.ca), who is a technician in the Botany Department workshop (room 1363; directly underneath the room that houses the growth chambers). John was able to create these rigs in less than a day after I described them to him, so if you’re thinking of starting a hydroponics project, you should consider having him do the work for you. He charges a small amount, and does the work very quickly. He’s also a very nice guy.

The rigs are based on a design that is pretty common in the world of hydroponics. The version described below is similar to one developed at Duke University by Jessica Selby and Kevin Wright (John Willis Lab). The idea is to suspend the roots of the plant in a nutrient solution, and provide oxygen to the roots via bubblers. As Greg says, the method requires development. However, it appears to work well for sunflowers (not so much for my plants). Anyway, here is the basic process of constructing the rigs.

Continue reading

Hydroponics test run

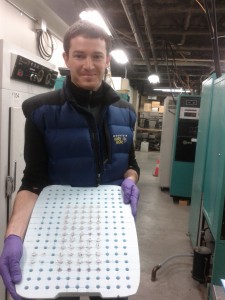
Dylan and I have been working on getting hydroponic testing up and running. The basic set up is a large tub filled with dilute nutrient solution, with aeration provided by an air pump. Floating on top of the water is a large foam sheet with holes. In each hole we put a 2 ml tube packed with rock wool and perlite along with a seedling. Extending below the hole is a large bubble tea straw to make sure the roots don’t tangle together while growing.

Dylan with hydroponics

Dylan holding the foam board

Continue reading

Pipettes and Pipetting

Hello All,

At the risk of insulting your intelligence I am posting some basic information about pipettes and pipetting so you won’t have any excuses for poor practice at the lab bench. The main reason that it is important to use our pipettes correctly is that we share them. Its not just your work that will be affected if you seriously contaminate a pipette or throw it out of calibration.

If you have an undergrad or new volunteer or employee doing anything with our pipettes show them this post and make them read the manual (below).

Continue reading

Newest Lab Member – Needs Name

Dear Colleagues,

It is my pleasure to introduce you to our newest lab member… actually it doesn’t have a name yet, but that’s the main reason for this post. This cute little guy/girl needs a name. I have been toying with TERMINATOR, HAL, iRob, and Rob(ot), but I’m sure you can do better. Could be male, female, or gender-neutral and whoever comes up with the best name gets a special treat.

Continue reading

Gel doc Dropbox (Allan)

Hi all,

I’m not sure how most of you were sharing your gels but I set up a dropbox folder within the Rieseberg gels folder.  Sending e-mails was tiresome.  If you’re interested in synchronizing your gels with your computer drag your folder(s) to the dropbox folder.  The dropbox account credentials (online and client) are as follows:

user=allandebono@allandebono.org

password=1d7hz@!

… Go through the process as usual to set up a shared folder.

Gel Slice – size selection or band isolation (Dan E.)

Cutting a slice from an agarose gel in order to size select DNA or to isolate a PCR product etc. is standard practice in lab genetics. This post is about how I do it in our lab, (as of Feb 2012).

There are three features of my current method that may be unfamiliar to you even if you’ve done this sort of thing before:

  1. The Dark Reader transilluminator.
  2. SYBR-Gold.
  3. Sigma X-Tracta gel punches.

Continue reading

Projector Tricks (Kate)

Below are settings that appear to get my computer (a MacBook) to communicate properly with the lab projector. I don’t promise that these settings will work for any other computer.

System preferences -> Displays

This will bring up two windows. One that corresponds to your computer screen and one that corresponds to the projector (see the top of the windows to determine which is which). Note that you can use the gather windows button to bring the projector window on to your computer screen.

Under the arrangement tab on the computer screen window uncheck mirror displays.

Under the display tab on the projector window choose 1024 x 768.

Note that choosing a widescreen resolution for the projector (e.g. 1600 x 900) results in a cut-off picture even though the projector claims to be widescreen.

I hope this is helpful!

Kate


Lab camera manual: Panasonic Lumix DMC-ZS7 (Rose)

A couple of points:

1. There is a spare battery, so please swap out and charge the one that you have just used.

2. The photos stored on the card could be deleted at any time (if a big job needs more room on the storage card), so PLEASE download them  before you take the camera back to the lab to avoid losing them.

3. The GPS should be turned on only when you need it (and set to OFF when you get on a plane).

DMCZS7 Basic Operating Instructions

DMCZS7 Operating Instructions

Shearing DNA for WGS Sequencing- Bioruptor (Dan E.)

This post is about fragmenting, or shearing, genomic DNA to a particular size range using the Rieseberg lab’s Bioruptor sonicator.

Most of the current whole genome shotgun (WGS) library preparation protocols for NGS applications start with fragmented DNA. Generally speaking, this starting DNA should be a certain size and, for multiple samples, consistently that size. This objective turns out to be quite a tricky thing to accomplish with the Bioruptor. Given that WGS sequencing will probably continue to be popular in the lab, I am posting here what I have learned so far about taking whole genomic sunflower DNA and smashing it to the size range that I want using the Bioruptor. If I discover anything else in future library preps I’ll add it below. If anybody else has useful tips please comment.

Continue reading

Bioanalyzer – RNA (Kristin)

Running a RNA Nano chip is very similar to running a DNA chip on the Bioanalyzer. However there are some things to keep in mind:

1. Clean everything with RNAse Away! before you start. I clean the chip loading stand as well as everything I am working with.

2. Make sure the reagents are at room temperature before you start to make the gel.

3. Before loading the chip, pipette 1.2 uL of each sample as well as the ladder into PCR tubes and incubate in the thermocycler for 2 minutes.

On the last point, I aliquot my samples into the PCR tubes and incubate them right before I load the gel. The instructions say to denature all the ladder in one go, but I have had better results when I denature an aliquot with my samples right before I run the chip.

Attached is a chip of 12 conifer leaf tissue extractions that worked out pretty well.

Conifer RNA Chip


Bioanalyzer (Kathryn)

The bioanalyzer can be useful for quantifying and quality checking double stranded DNA, RNA, and proteins. This method of gel electrophoresis will tell you both fragment size and concentration for each fragment, using up only 1 uL of sample. The reagents and chips are expensive (for the High Sensivity chips, ~$100/11 samples/single use  chip), and have limited shelf life (4 months or less).

Rieseberg lab members have used this machine to check the quality of sequencing libraries and cDNA for microarray expression analyses. Various DNA and RNA kits are available, depending on what you want to measure, and their specs are at the bottom of this post.

Continue reading

Quantifying DNA (Dan E.)

This post is about quantifying DNA samples in the Rieseberg lab, i.e. using the tools we have available to us in our lab in the Biodiversity building as of November 2011.

There are three ways to quantify the amount of DNA in an aqueous solution (e.g. DNA dissolved in water or TE):

  1. Nanodrop (spectrophotometry).
  2. Qubit (flourometry).
  3. Agarose gel with EtBr (also fluorometry -> UV lightbox + your eyes = fluorometer).
  4. (There is also the BioAnalyzer – I’m going to ignore that here and focus on methods to measure high mw genomic DNA).

These methods have different benefits and limitations but they are all valid and useful.
Continue reading