I’ve recently been assaying the proline content of my drought stressed sunflowers, and I have found an assay that is relatively cheap and easy. For those who don’t know, proline is an amino acid that is associated with stress tolerance and recovery in plants. It is expressed in response to many stresses, such as salinity, osmotic stress, extreme temperature, UV radiation, metal ion toxicity, pathogens, and more. Here, I outline how to get this protocol working, in case anyone is interested in checking proline content in their own plants. This assay was adopted from Ábrahám et al 2010.
This blog post will go over wet lab procedure, and result analysis in imageJ and R.
For a printable version of the wet lab procedure, see here.
Materials
Chemicals:
Isatin (small bottle opened November 2019 is in the fumehood)
Methanol
Glacial Acetic Acid
20% Ethanol
l-Proline (Must be ordered. The smallest container on Sigma Aldrich (10mg) should be enough to test ~200 samples)
Liquid Nitrogen
Other:
Chromatography Paper OR Whatman 3MM paper
Thermometer(s)
Pestle and Mortar
================================================================
Step 1: Making Isatin Chromatography Papers
This is a recipe for making about ten 8″ x 8″ chromatography papers. If you wish to make more, double the recipe. Safety notice: isatin powder is very dangerous if inhaled. Always measure out powder in the fumehood! Once dissolved, isatin is still toxic, but safe as long as gloves are worn.
1. Mix 50mL methanol and 1.75mL glacial acetic acid.
2. In the fumehood, measure out 0.5g isatin powder and add to the methanol/acetic acid, then mix until fully dissolved with a stir rod. It will take a few minutes.
3. Once all isatin is dissolved, pour into a container that is big enough to fit your papers if they are laying flat (i.e., for 8″x8″ papers, you’d want a container that is at least 8″x8″). Submerge each paper in the solution for a few seconds, then remove and let the excess drip off for a few seconds. Lay the papers out on paper towel in the fumehood to dry for about 1hr, flipping once.
4. Store papers in the dark. They are good for about two weeks.
================================================================
Step 2: Extracting Proline From Samples
I used young leaves, flash frozen after collection. It is also okay to wait a bit before flash freezing your tissues, or to collect tissues fresh and extract proline the same day without freezing first. Proline seems to be fairly stable.
To extract proline:
1. Weigh your tissue. Aim to have about 100mg of tissue for each extraction.
2. After weighing, put tissue into a mortar, then add 10uL 20% ethanol for each mg of tissue (e.g., 50mg –> 500uL ethanol, 100mg –> 1000ul ethanol, etc).
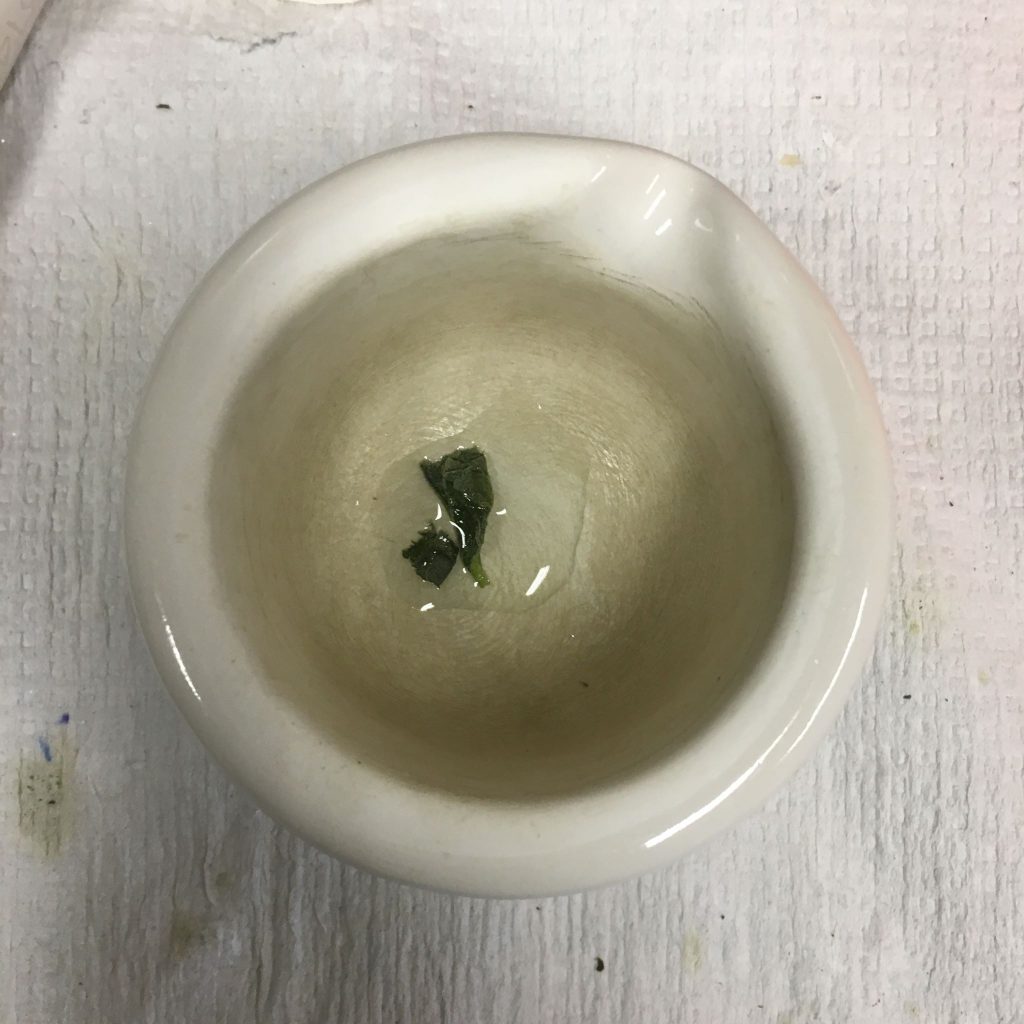
3. Grind the tissue and ethanol with the pestle for a fixed amount of time (I chose 30 seconds). After grinding, there should be some ground tissue, as well as green fluid in the bottom of the mortar. Pipette this green fluid into a 1.5mL tube.
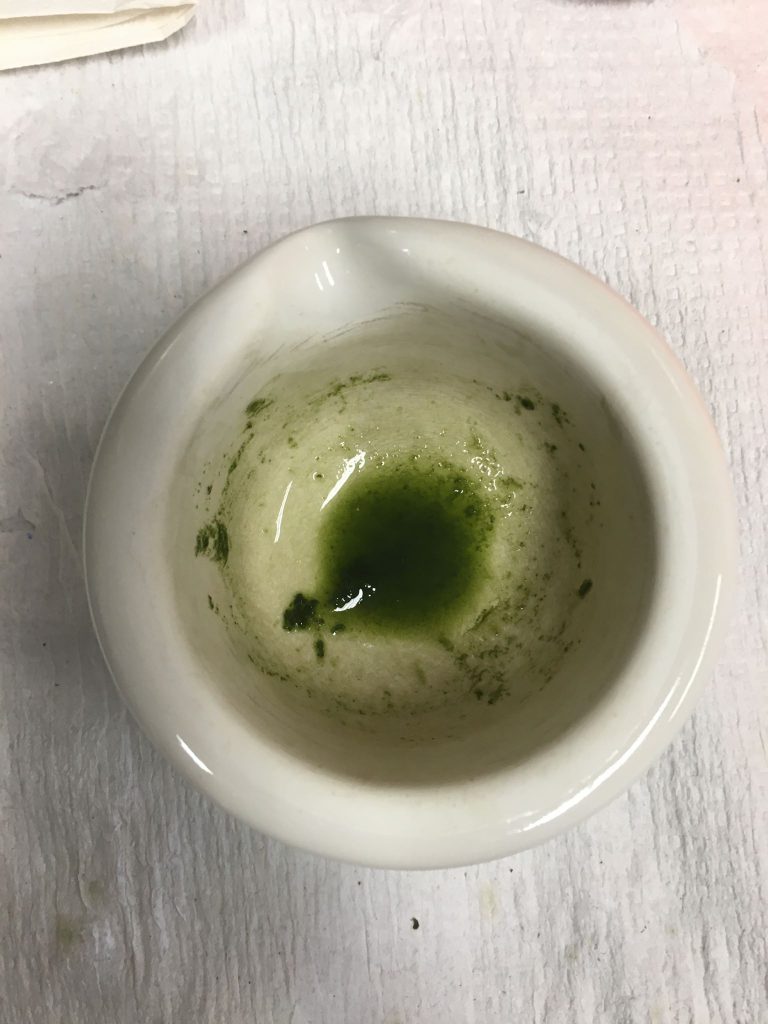
4. Spin extracted fluid at 14,000rpm for 5 minutes. The supernatant of this spin contains the proline, and it is what will be used for chromatography.
================================================================
Step 3: Doing the Chromatography!
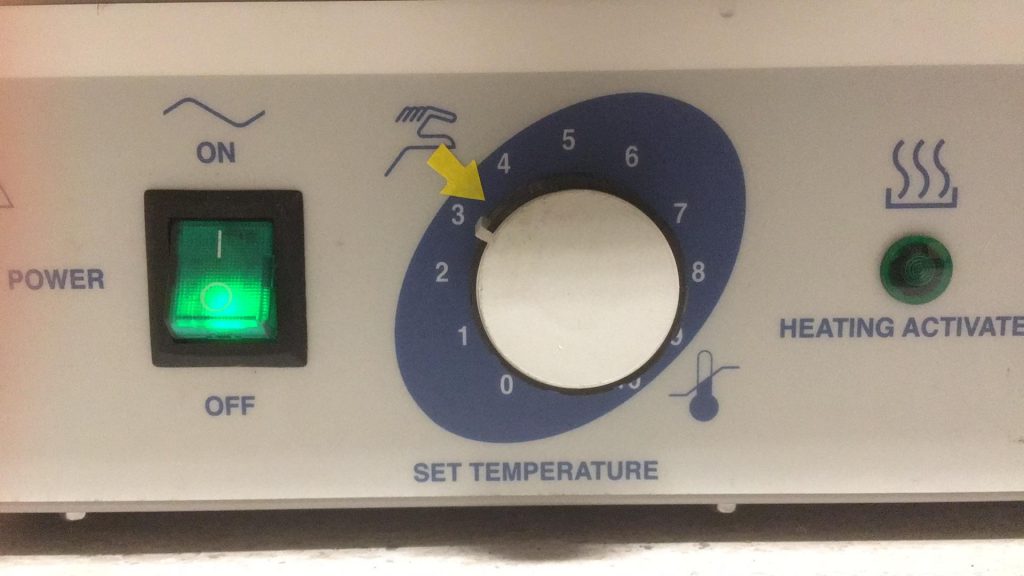
Before starting, set the left drying oven in the lab to 90ºC. The best way to do this is stick a thermometer (or two) into the oven, and set the temperature knob to line up with the yellow tape arrow between setting 3 and 4 (see below). Let the oven heat up, and check on it in about 20 minutes to make sure it’s not too hot or too cold.
1. First, make a calibration standard to compare your samples against. Use the L-proline standard ordered from sigma and add 20% ethanol to your desired concentration, then using the dissolved standard, produce a series of standards with decreasing concentration. I recommend:
5mg/mL || 1 mg/mL || 0.5mg/mL || 0.4mg/mL || 0.3mg/mL || 0.2mg/mL || 0.1mg/mL || 0.05mg/mL || 0mg/mL (20% etOH blank)
2. Pipette 10uL of each standard onto a piece of dry isatin paper, and then 10uL of each sample (the supernatant from the spin in section 2). If the sample was not just prepared, spin it again for about 3 minutes, and mix it VERY gently before blotting to limit the amount of tissue particles that get on the paper. Note: I recommend making a replicate of each standard and sample as well, if you want to use my calibration script to convert your colorimetric values into mg/mL values later.
3. Leave the paper on bench to dry 30 minutes. During the wait, check on the oven again. Adjust it to make it slightly hotter or colder if necessary. The oven is quite finicky and difficult to get to exactly 90ºC — anything between 85ºC and 95ºC seems to be good enough.
4. After 30 minutes, place the paper in the oven and wait 20 minutes.
After 20 minutes, once you the paper is removed from the oven, it should look something like this (note: it seems that, at least in annuus, unstressed sunflowers don’t produce any baseline proline. If your samples are not turning blue, don’t despair):
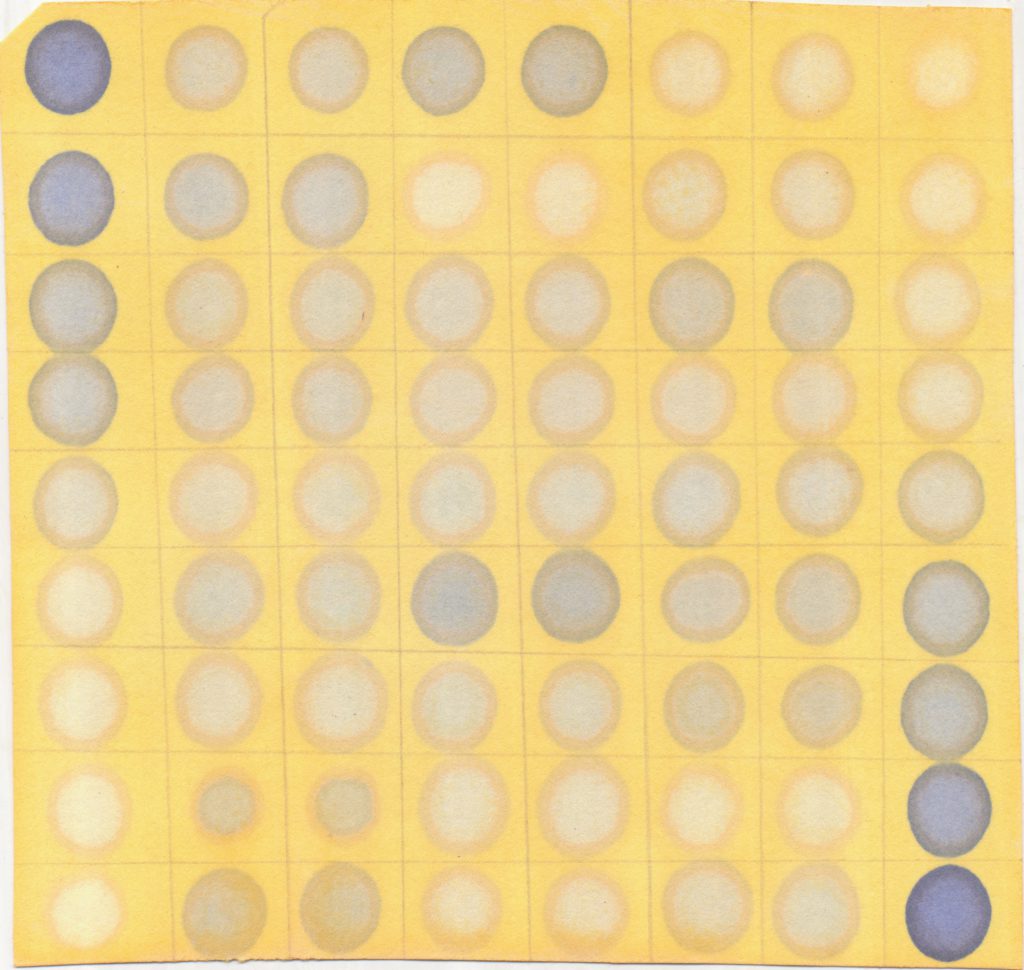
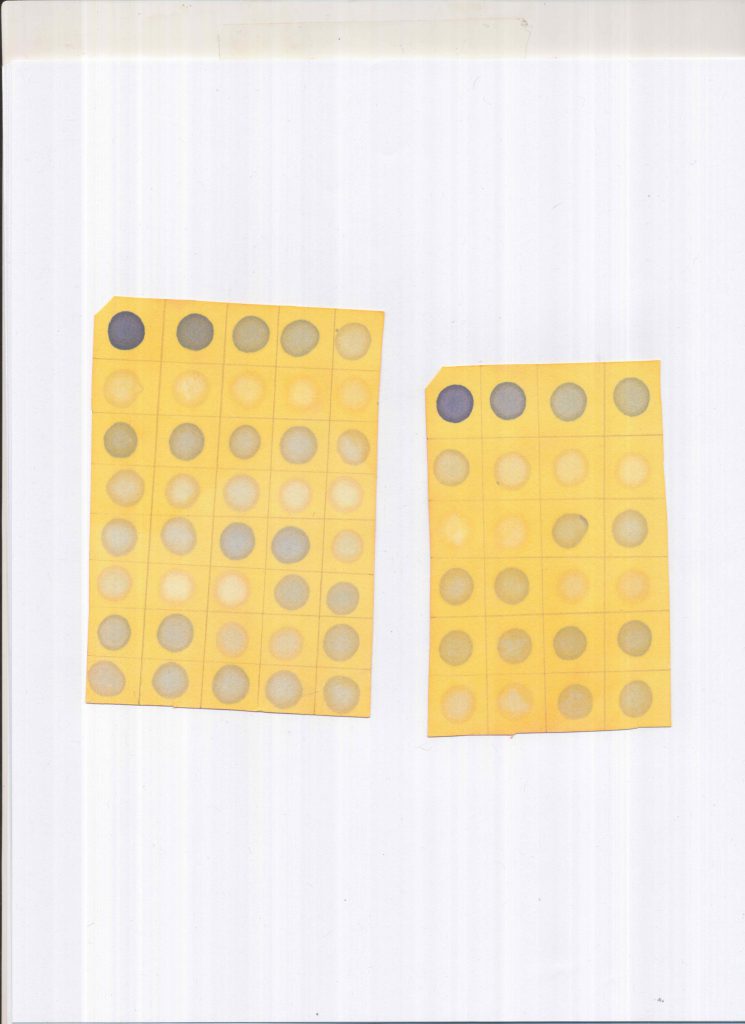
5. Scan the paper using the lab scanner. Turn on the scanner, then open MP Navigator EX. There’s a dropdown menu that asks for the document type. Select colour photo. DO NOT select colour document, as the quality of the image is very poor (see below). Save the image as a jpeg. We can now analyze the image.
================================================================
Analysis in imageJ
1. Open your scanned photo in imageJ, and in the menu bar select
Analyze > Set Measurements…
2. A menu will pop up. Uncheck everything except “Mean grey value”
3. To measure the proline content of a dot, use the oval selector tool on the dot. Limit the amount of non-dot space you select, as this can make your proline content appear falsely low.
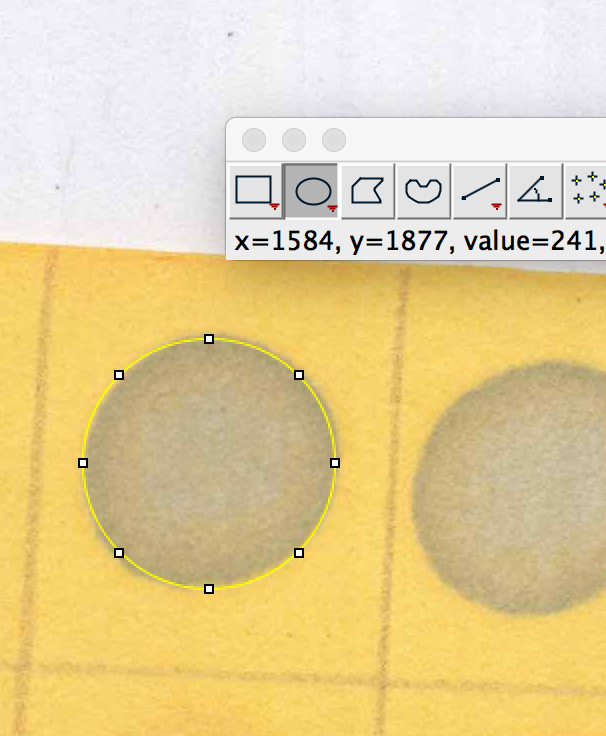
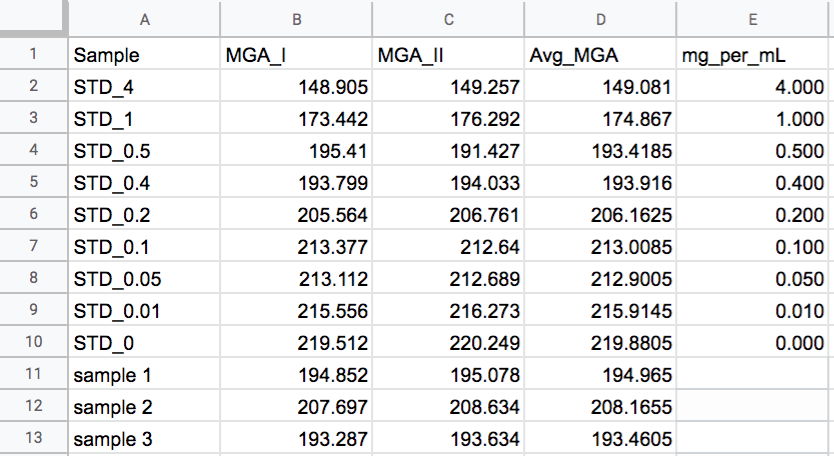
4. With the dot selected, hit ctl+m on PC, or cmd+m on mac, and a measurement window should pop up with a number. This is the mean grey area of your dot. Repeat for all dots. If you want to use my calibration script, store the data in a file with the following column headers and column order:
================================================================
Calculating Sample Proline Content with a Calibration Curve in R
If your data is in the format above, you can use this script below to find the proline concentration of your samples. All that would need to be altered is lines 6-8:
[6] batchname <- “batchname” #If doing multiple batches, you can change “batchname” to something more descriptive, but this is optional
[7] batch.csv <- “data.csv” #”data.csv” is the name of your input file
[8] number_or_standards <- 9 #In my assays, I was using 9 standards. If you are using a different number, change the standard # accordingly.
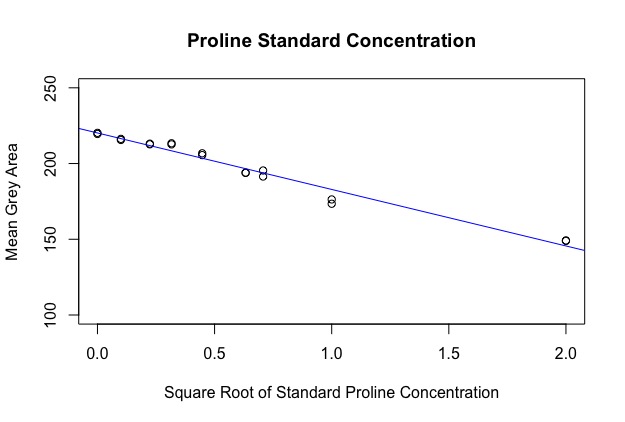
The first part of the code makes a calibration curve by plotting a regression against your standard values. Because the area of a dot was calculated, the data is quadratic, however I’ve circumvented this by taking the square root of the x-axis before running the regression. You should get an output image like this:
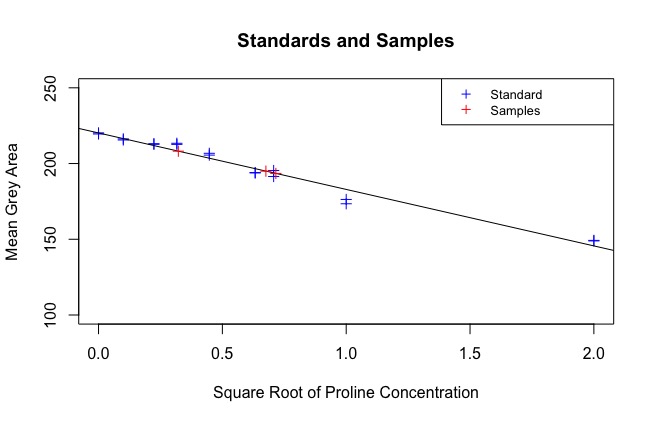
The next part of the code uses the regression line to find the sqrt(concentration) of each sample. See:
At the end of the code, a data frame called “Sample_PC” is produced that has the true concentration of each sample, calculated against the standard. These are your results: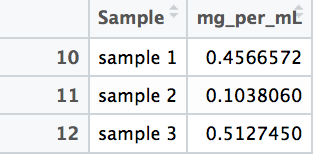
Overall Efficacy
This method can accurately predict proline concentration within 0.3mg/mL, or within 0.1mg/mL if multiple experimental replicates are performed.
Under drought stress, wild Helianthus annuus individuals seem to express anywhere between 0 and 1 mg/mL.