
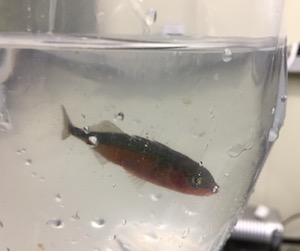
Threespine
stickleback
stykylbak, sticklebanke, sticklebanck, stickle bag(ge), stit(t)le bag(ge), stittle-back, stickle-back, stickleback
This page describes our methods for working with threespine
stickleback.
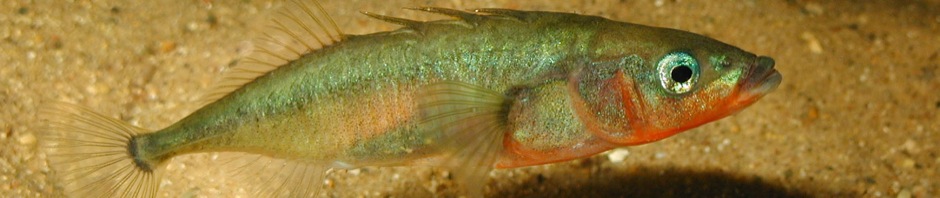
The three-spined stickleback (Gasterosteus aculeatus complex) is a small fish common in many temperate coastal marine and fresh waters of the northern hemisphere. Niko Tinbergen’s studies of the behavior of this fish were important to the development of the field of ethology. It has a fully sequenced genome and has become a model vertebrate for studies in the fields of animal behavior, evolution, genetics, and toxicology.
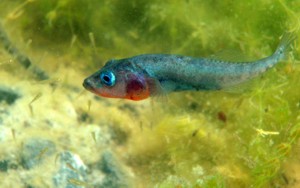
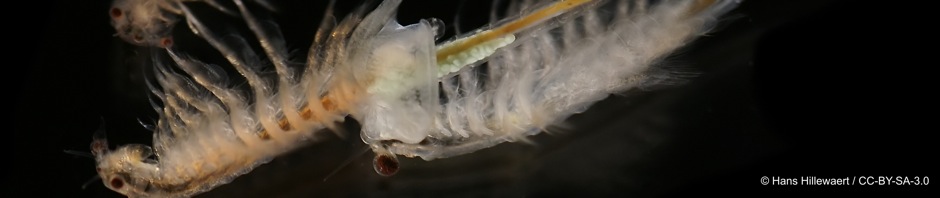
The photo above by N. Bedford shows a male of the benthic species from Paxton Lake, Texada Island, BC. He is guarding a family of stickleback fry that hatched a few days previously.
The threespine stickleback species complex reaches the height of its diversity in lakes and streams of British Columbia. The populations occurring here include some of the youngest species of organisms on earth. Most water bodies contain only a single stickleback species, but pairs of species have evolved independently in a few small lakes that are less than 12000 years old. The system has wonderful properties that allow us to address very basic questions concerning the roles of resources, species interactions, phenotypic plasticity, sexual selection and other factors in the evolution of diversity. Distinct populations and species produce viable and fertile hybrids, making it possible to investigate the genetic basis of species differences.
Research facilities
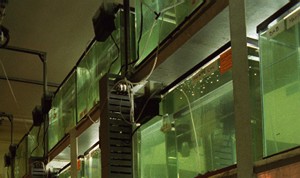
In addition to field sites, we conduct research on stickleback in an indoor aquatic facility and outdoor experimental ponds.
Wet lab facilities
Our wet lab consists of two air-conditioned rooms in the InSEAS aquatic facility (one with stand-alone aquariums and the other with a flow-though aquarium system), plus controlled-temperature environment chambers. These facilities contain hundreds of aquariums that currently mainly house stickleback.
Experimental ponds
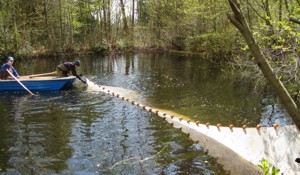
This facility includes 20 ponds, each 25 m x 15 m. An aerial view is seen below. Click the image below to see a larger view in Google Maps.
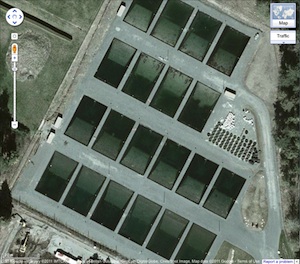
Each pond contains a shallow littoral area at one end and a 6 m deep end. The littoral area contains a layer of sand and limestone gravel extracted from surface mines near Paxton Lake, Texada Island. The ponds have been seeded with plants and invertebrates from Paxton Lake, an 11-ha lake containing a benthic-limnetic stickleback species pair. Apart from their construction and initialization, the ponds are unmanipulated environments. We use them to carry out experiments on adaptation, natural selection, and genetic mapping of natural variation in behavior and other traits.
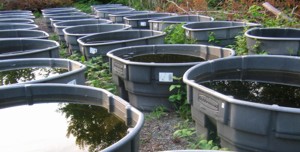
Mesocosms (cattle tanks)
The experimental pond facility includes 80 plastic rubbermaid barrels, each 2 m in diameter, for experimental studies of aquatic organisms.
Old experimental ponds
This outdoor facility is no more and has been replaced by the new experimental ponds. It too was located on the South Campus of the University of British Columbia.
The site contained 13 ponds. Each pond was 23 x 23 m2 with a bottom that sloped gradually from 0 m at the edges to 3 m deep in the center. The ponds were constructed in 1991 and seeded with plants and invertebrates from Paxton Lake, an 11-ha lake containing a benthic and limnetic stickleback species pair. The ponds were lined with polyethylene overlaid with 0.25 m of sand, and were bordered with limestone extracted from surface mines near Paxton Lake. Apart from their construction, initialization, and use in prior experiments, the ponds were unmanipulated environments.
How to raise stickleback
This section describes the basic procedures we use to make crosses and raise stickleback.
Do not use water obtained from copper pipes, as the copper ions kill stickleback.
Set up the aquarium in a cool room. 17 degrees C is perfect for our local populations. Above 20 degrees is dangerous.
Standalone aquariums - McPhail Room
We use 100 L aquaria to keep and raise stickleback. The fish grow well under these conditions provided densities are kept low. Standalone tanks are stacked on shelves in the McPhail room of the InSEAS aquatic facility. The greatest challenge is getting the nitrogen cycle going in a new standalone tank.
All wild fish go into the McPhail Room – do not bring wild fish into the Flow-through Room.
Initial setup
- Dechlorinated tap water is fine. Add extra conditioning, such as Prime or Amquel, as backup dechlorination in case of a spike in chlorine in the water supply. Add baking soda if pH is below 7 (Vancouver water is sometimes acidic).
- To aid fish health, add 100-200 g of synthetic sea salt (e.g., Deep Ocean Synthetic Sea Salts) to each 100 L aquarium. Add even more, 500 g, if you are raising crosses between freshwater and Little Campbell River marines (LCM), which tend to develop poorly at low salinity. This will bring salt concentration up to about 5 ppt.
- Add bicarbonate of soda to raise the pH to desired levels (see next section for information on adjusting pH).
- Add crushed coral or limestone to the tank. This keeps the pH high and the water hard, which is best for minimizing disease. Many but not all of our study populations live in hard water lakes.
- One airstone per 100 L aquarium is fine (you don’t need to add one if you are also using a sponge filter). Keep the flow light when the fish have just hatched, because they are not strong swimmers.
- Use sponge filters for babies and add power filters for juveniles and adults. For small juveniles, put a sponge on the end of the intake pipe to prevent sucking up fish. Use angel hair or double up the sponges in the filter box for extra surface area and filtration of fine particulates. The foam inserts of the power filters last a long time but need periodic cleaning. Squeeze the sponge filters every two weeks or so to keep the sponges from plugging up.
Start the nitrogen cycle
This is the greatest challenge when starting up a tank for fish. The filters provide a surface for the bacteria that break down ammonia to nitrite and then to nitrate. Ammonia and nitrite are toxic, whereas nitrate is relatively harmless. However, it takes at least a month for the bacteria to reach sufficient numbers to handle all the waste produced by the fish.
To get the nitrogen cycle up and running:- Set up new tanks at least one month before introducing your valuable fish.
- While you wait, keep a goldfish, sculpin, or a very small number of non-essential stickleback in the tank to help get the nitrogen cycle going before you replace them with your valuable fish one month later.
- Another technique, while you wait, is to add ammonia daily directly to a fish-less tank and keep testing the water until nitrites drop to zero. Your tank is ready to receive important fish.
- If you don’t have the luxury of a one-month advance, but must throw your fish straight into a new, sterile tank, then you will need to change the water frequently to keep waste levels down for weeks while the nitrogen cycle gets going. Add a filter sponge taken from a older tank whose nitrogen cycle is functioning (beware of communicating disease). Try replacing 1/3 to 1/2 of the water every two days for the first two weeks at least. Add Amquel or other conditioner to help remove nitrite as well as ammonia (not all products will do both). Make arrangements for water changes on weekends if you are not around to do it yourself, especially long weekends.
Manage the nitrogen cycle
- Keep fish densities low, even after the nitrogen cycle has started to work. A 100 L tank can handle about 15 adult fish when everything is going well (maybe even 20 if you are not dealing with large benthic or marine fish). If you go higher, be prepared for the higher risk. Go lower if the fish are irreplaceable.
- Remove dead fish immediately. Take special care on weekends, if you are alone in the lab. You might be able to avert disaster this way.
- Do not overfeed fish. If the fish food that drops to the bottom of the tank isn’t eaten within a few minutes, siphon the excess away.
- Test ammonia and nitrites regularly. See the next section below.
- Apply regular water changes (see below).
- If you are raising fish from eggs, you might end up with as many as 200 juveniles from one clutch in a single aquarium. This is unsustainable. Families should be divided among multiple tanks as soon as the young fish are large enough to tolerate a move.
- Make sure your filters are working properly. Restart them immediately if there has been a power outage.
Adjust ammonia and pH
These instructions are from the standard operating procedures, SOP for adjusting ammonia and the SOP for adjusting pH.
Ammonia. Test ammonia (NH3) using manufacturer’s instruction. Ammonia levels should be at 0 ppm (mg/L) any level above zero can harm fish. Ammonia builds up due to the breakdown of organic waste and the nitrogen cycle and can be toxic. The presence of ammonia indicates possible overfeeding, too many fish, or inadequate biological filtration. If the ammonia test reveals ammonia levels above 0 ppm, follow the instructions below:- Scrub off excess algae with a brush and perform a 25% water change.
- Ensure tank is seeded/developed with nitrogenous bacteria to break down ammonia.
- Ensure that the filters are circulating water at a sufficiently high rate.
- If the tank has only a foam filter, add a higher-flow (box) filter.
- Lower the density of fish in the tank to decrease the amount of ammonia produced.
- Test the water again after 24 hours.
-
Add limestone or crushed coral to the aquarium. The carbonate in these
compounds will react with and remove excess H+ ions in the water.
- Crushed coral and limestone are advantageous as the release of carbonate is governed by the surrounding water chemistry. As a result, crushed coral and limestone will raise the pH to a maximum of 7.8 regardless of the amount added. Crushed coral and limestone will develop a hard surface layer and should be scrubbed once every 3 months to ensure reactivity.
-
Add baking soda to the aquarium (gradually).
- The direct addition of baking soda can raise the pH very quickly and it is possible to overshoot the target pH. This can cause pH shock in the fish. It is best to gradually add baking soda by dissolving 1 teaspoon of baking soda in 1 cup of water for every 5 gallons of water in the tank. Most of our tanks are 30 gallon. Add ¼ of the baking soda-water mixture to the tank, wait 30 minutes or longer and add another ¼. Continue this procedure until the mixture is used up. Wait 24 hours and test the pH again.
-
Aeration can raise the pH slightly.
- Aerate the water by adding an air stone to the fish tank or increasing the flow of air. Excess CO2 dissolved in the water decreases pH (makes it more acidic). As the tank water is exposed to atmospheric air through aeration, the tendency of the dissolved gases to approach equilibrium will transfer oxygen into the water and carbon dioxide out of the water, resulting in a higher pH. This method will result in only a slight change in pH. Use an alternate method if you require a larger magnitude change.
- Use a commercial alkaline buffer and follow manufacturer’s instructions.
Regular water changes
A functioning nitrogen cycle in an aquarium will convert toxic ammonia and nitrites to nitrates, which are less harmful to fish. The way to remove nitrates is via regular water changes. The following is from the standard operating procedure SOP for recommended frequencies and amounts of water changes to standalone tanks.- Once your tank is fully cycled (tests reveal zero nitrites and zero ammonia), tank water needs to be changed on a routine basis.
- The frequency and volume of water change depends primarily on the amount of ammonia being produced; this varies with fish density and feeding schedule (over feeding raises ammonia).
- A 25% water change should be carried out every 2-3 weeks on healthy tanks (low fish density, no detectable ammonia). If 25% water changes cause too much stress, decrease the volume of water being replaced to 10% and increase water change frequency.
- To minimize the stress caused by water changes, use aged water (same temperature, adjusted pH levels).
- Increase the volume or frequency of water changes when tanks show spikes in ammonia and continue to test ammonia levels daily until the tank stabilizes at zero.
- To achieve targets, it may be necessary to lower fish density and the amount of feed.
Cleanup
- Scrub and siphon the tanks before draining.
- Airline tubes can be left in the empty tank but just take a sponge and wipe down the line.
- Remove and clean filter sponges and rinse filters out. The filters can then be left on the empty tanks with their cords tied up.
- Any ‘furniture’ (plants, PVC pipes etc) can be thrown in the Virkon bath for sterilization, there’s a bucket on the floor filled with pink solution next to the sink.
Flow-through system
The Flow Room is for lab-raised fish only, to minimize disease transmission. Do not bring fish from the wild into this room, or dip nets and other equipment from the McPhail room to minimize the chances of contamination.
Initial setup of tanks
Water quality is managed centrally, so there’s little setup or maintenance needed at individual tanks.- Choose empty aquaria and add your fish.
- Look over each tank and ensure that water is flowing out of the tap and the water level is not too high.
- If the water level is high, lower the flow from the tap and rinse out the sponge over the outflow pipe as it may be clogged.
Manage water quality
- Check room temperature and record it in the daily monitoring spreadsheet.
- Every 2 weeks, clean the end of the pH probe on the pH doser in the back corner of the room. Use a soft toothbrush.
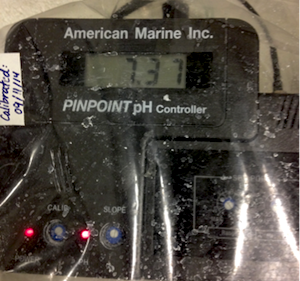
- Record the pH reading on the pH doser in the back corner of the room. pH should be 7.4. If pH is below 7.2, clean the pH probe to ensure an accurate reading (see above step).
- The doser is pre-set to adjust the system pH to 7.4 by adding soda ash from the barrel. When the pH reading stabilizes, top up the barrel by adding dense soda ash and dechlorinated water. The amount of soda ash added does not need to be precise.
- To change the dosing parameters on the system, refer to the Pinpoint pH Controller User’s Guide.
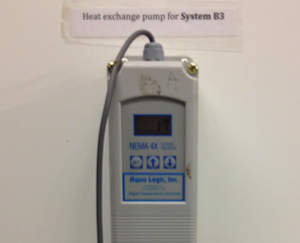
- Check the water temperature and O2 saturation using the PointFour monitoring system in Room 1208A. Press the “home” button (house icon). Our recirculation system is identified as SYSTEM B3. Measures of water temperature and oxygen saturation should appear on the screen. Record these values in the record book.
- Water temperature is currently set to 17 C. The system will allow the water temperature to fluctuate ±l degree before setting off a temperature alarm.
- If the temperature is outside the desired range, check that the heat exchange pumps are functioning (you should be able to feel the machines vibrating if you touch them). They are the two machines against the right wall as you enter the room. They are labeled “Heat exchange pumps for system B3”. The screen should read “17” degrees. If it the reading is above or below 17, contact Patrick Tamkee and ask him to adjust the “top up” water to the system in the Biosciences basement. Turning the top up water ON will lower the water temperature in the system, as cool water from the UBC well source will be introduced into the system. Turning OFF the top up will allow the heat exchange pumps to maintain a water temperature of 17 degrees. If there are any other problems with water temperature, contact Patrick Tamkee right away.

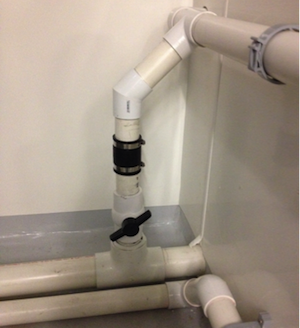
Adjust water flow
-
The main valve that controls the water pressure is located in the back
right corner of the control room (see below).
This valve determines how much water gets diverted back to the filter pump and into the pipes connected to the fish tanks. In an emergency (i.e water overflowing), adjust this valve first.
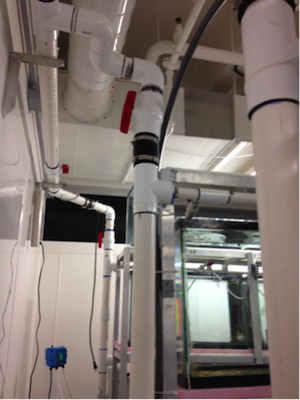
-
There are additional ball valves located above each rack in the main
Flow Room that control how much water feeds each row of tanks.
BE CAREFUL when adjusting these valves. Turning off all the taps at the tank level will cause a build up of water pressure that could lead to cracked pipes or leaks between each joint. Always adjust the main valve in the support room before any major adjustments at the tank level.
Cleanup
- Scrub and siphon the tanks before draining.
- Airline tubes can be left in the empty tank but just take a sponge and wipe down the line.
- Any ‘furniture’ (plants, PVC pipes etc) can be thrown in the Virkon bath for sterilization, there’s a bucket on the floor filled with pink solution next to the sink.
Make crosses
Obtaining eggs from females
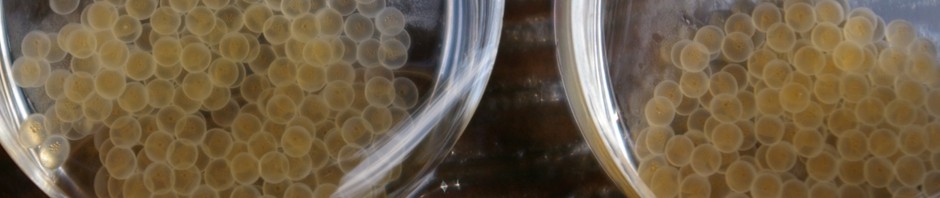
A female ready to spawn can be identified by her abdomen shape at the cloaca. If ready to lay eggs, one can almost see the first egg; at this point her abdomen at the cloaca is sharply angled, almost like the corner of a box. The eggs should come after gently squeezing her body above and forward of the egg mass and, while maintaining pressure, sliding your fingers posteriorly. The eggs, when they appear, will stick to one another in a clump. If they dis-aggregate then the female was not ready and you should throw the eggs out. Keep the eggs covered with water, but keep them near the surface for oxygen.
Testes
We haven’t developed a method to extract sperm without killing the male. Extract testes from the male after giving him an overdose of anaesthetic. If you do not actually require separate crosses, you can fertilize several clutches with the testes from one male. Male sperm will keep in Hanks solution for a few days (see Storing sperm, below). Shred the testes with tweezers and stir around the egg mass .
Remove the testes after a few minutes otherwise they might decay and attract fungus. It is worthwhile to check that the eggs are fertilized and begin development (the easiest way to tell is under a low-power microscope—look for the separation of outer and inner membranes).
Raise crosses
Raise eggs
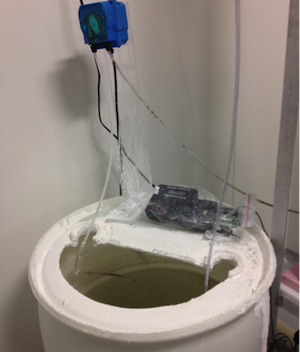
We use either of two approaches to raise the eggs to hatching. The egg-tank method involves raising eggs for the first 7 days in small 5 gallon fish tanks and then transferring the eggs to standard 100 L tanks just before they hatch. The 7 day period assumes that the rooms are at 17 degrees. If the room is warmer they may hatch sooner. Egg-tanks should be cleaned out and made fresh every 2 weeks. The big-tank method involves raising eggs entirely in the 100 L tanks.
In either case, place the eggs in a yoghurt cup having mesh screen on the bottom. Suspend the cup from the side of the aquarium so that the eggs are well submerged. Door screen is best, because the fry drop through after hatching (another reason to make sure to transfer eggs from egg-tanks to 100 L tanks before hatching begins). Put an airstone nearby to provide oxygen and maintain a current around the eggs. Avoid fine streams of bubbles directly underneath the eggs because air may get trapped under in the egg mass, bringing it to the surface, where the eggs may dry out.
The water in the tank should be dechlorinated. Adjust the pH to 7 (using baking soda or pH adjuster). Add 100-200 g of synthetic sea salt (e.g., Deep Ocean Synthetic Sea Salts) per 100 L water. Add at least 500 g/100 L if you are raising crosses between freshwater and Little Campbell River marines (LCM), which tend to develop poorly at low salinity. Also add Methylene Blue solution to the tanks to help reduce fungus attack. Mix the powder thoroughly with water in a falcon tube and then add a few drops to the tank so that the water color is a pale blue (don’t add the powder directly to the tank). The 100 L tanks should be set up at least a day in advance of the egg transfer, so the filters have time to clean the water and help dissolve/mix the salt and baking soda. Use only a sponge filter in the tank. Make sure power filters are shut off. Use only sponge filters until young are large enough to handle the current and suction of a power filter.
Tend the eggs daily and remove clots of fungus that appear. Be careful not to tear nearby eggs. You will never manage to be free of fungus, but plenty of aeration and the methylene blue will help to avoid the worst. Our experience is that if fungus is out of control in a clutch of eggs only a couple of days after fertilization, then the clutch probably wasn’t fertilized after all.
Raise young fry
When the young hatch they will sink to the bottom and stay there for a couple of days. Then they will swim up and gulp some air from the surface to establish neutral buoyancy. Make sure that the sponge filters and airstones are not bubbling too vigorously at this time (keep the power filters off until the babies are older). After a few days you will start to see the tiny babies hanging out together off the bottom, especially in the corners of the aquarium.
Optional: Start adding a squirt of infusoria to tanks the day they hatch. You may also add a few drops of pet-shop liquid food for egg-layers. They don’t eat the stuff; rather, they eat the paramecium and possibly some bacteria. Continue adding infusoria for about 5 days after hatch, by which time all the fry will be free-swimming.
One day after hatching, start feeding them microworms, if available, and small quantities of first-instar brine-shrimp nauplii. Add enough brine shrimp so that after they have fed their bellies are orange and swelled. It is best to feed twice daily until they are a few weeks old, but once daily will also work if you don’t mind the slower growth.
When the young reach about 2 cm, start feeding them frozen bloodworms. Continue to feed them a small amount of brine shrimp nauplii as well, even as adults.
Troubleshooting
Nitrites are high
Usually a problem in recently cleaned tanks, or overstocked tanks. Monitor N levels monthly and note level on tank. When a tank has detectable nitrites:- change 1/2 of the water immediately
- add 5-15 ml of Prime (more directions on bottle of Prime)
- add another filter
- move some fish to another tank
- recheck N next day, continue above steps until problem solved
Continue to replace 1/3 of the water in the tank daily until nitrites are undetectable .
Filters not working/water not flowing properly
Check whether it’s a single filter or a bunch in one area. If single:- check if it’s plugged in (make sure it’s not a new baby tank and therefore supposed to be unplugged)
- check power bar is working
- jiggle motor fan with finger to get it working again (sometimes they jam)
- check u-tube and downspout are attached properly near the motor and are sucking up water (sometimes the filter is on, but no water is cycling – especially important to check after cleaning filters)
- check that the downspout isn’t blocked (plant material/dead fish/mesh clogged with dirt)
- check for broken parts and discard broken bits, re-assemble filter with new part (there’s boxes of filter parts in one of the rooms, including motors, bodies, fans etc)
- follow the power to where it doesn’t work (the power bar has probably gotten wet or there’s a short somewhere)
- Jump start all filters that don’t automatically restart themselves, but do it after you’ve sorted the problem out or you’ll be restarting things all day.
Rooms Are Warm
This needs to be fixed immediately or fish will die.- If Patrick is around, tell him about the problem. If he’s not around, phone plant ops ‘trouble calls (ext 2-2173)’ immediately, and tell them it is an animal care emergency.
Preserve sperm for up to 2 weeks
Materials needed
- 49.5mL of Ginsburg’s ringer solution (a buffer solution - recipe is below)
- 0.25mL of Gibco antibiotic/antimycotic (Invitrogen cat# 15240-096, 100x concentration),
- 0.25mL of Gentamycin sulfate hydrate, (Invitrogen cat# 15750-060, 10ml, 50mg/ml liquid)
- 1 falcon tube.
Preparation of the storage solution
- measure out 49.5mL of Ginsburg’s ringer solution and pour into a falcon tube.
- pipette 0.25mL of both the Gibco and Gentamycin solutions into the Ginsburg’s solution in the falcon tube.
- close cap and shake well in order to thoroughly mix solution
Sperm storage
- after removing the testes from the male stickleback place each testis (or portion of testis) in it’s own Eppendorf tube.
- pipette in enough Ginsburg’s solution to fill half the tube.
- make sure that each testis (or portion of testis) is completely submerged in the solution (it should sink to the bottom).
- store in fridge
- replace with fresh Ginsburg’s solution every 7-10 days for storage up to 6 weeks.
Recipe for Ginsburg’s ringer solution
- To 900 mL of ddH2O, Add: 6.6 g NaCl 0.25g KCl 0.3 g CaCl2
- Add 0.2g NaHCO3 last
- Mix well, and bring up to 1 L
- Autoclave
Cryopreserve sperm
The following is derived from the Medaka book, which is based on Aoki et al (1997)
Contributed by Tom Howes: “The main modifications I made are that I use 200 ul of medium to mince the testes (instead of 60) and store aliquots in 5 ul microcapillary tubes (Drummond microcaps) instead of 10 ul. That gives plenty of aliquots that can be stored inside several 1.8 mL cryotubes (Nunc #377267).”
Freezing stickleback sperm
- Remove the lids from eight 14 mL conical tubes and embed them in dry ice in a styrofoam container (Can use a hammer to tamp them down into the dry ice bed).
- In a regular ice bucket, start chilling eight labeled 1.8 mL cryotubes, and a 1.5 mL tube with the lid open and resting on the ice. Start thawing an aliquot of Fetal Bovine Serum (heat inactivated and cleared).
- When ready to dissect out the testes, prepare the freezing medium fresh (180 ul FBS + 20 ul dimethylformamide) and place it in the cap of the 1.5 mL tube on ice. Place the dissected testes in the medium and mince thoroughly. Remove any large tissue fragments.
- Use some of the fresh sperm prep if needed (5 ul is plenty). Draw the rest into individual 5 ul microcapillary tubes (the Drummond microcaps come with their own squeeze bulb that you can use to create a small amount of negative pressure). Distribute the microcap tubes to the 1.8 mL cryotubes on ice. Put the lids on the cryotubes, making sure the capillary tubes go inside the threading of the lid so they don’t break.
- Put the cryotubes inside the 14 mL conical tubes embedded in dry ice and leave them there for 20 min. Then dump the cryotubes into liquid nitrogen and move them to storage in a liquid nitrogen- cooled freezer.
Thawing an aliquot
Warm ~100 ul of Hank’s buffered saline solution to 30 C. Take out a cryotube and keep it in liquid nitrogen until ready. Move the cryotube onto dry ice and remove one microcap tube without thawing the others (use forceps chilled on dry ice). Hold the microcap tube between the fingers, and it will quickly thaw enough that you can use the squeezebulb to eject the contents into the Hank’s solution. Move the cryotube back to liquid nitrogen. Mix the thawed sperm solution briefly and use for fertilization.
Prepare live food
This section provides information on preparing live food to feed stickleback.
Brine Shrimp culture
These instructions are from the SOP for brine shrimp
Materials needed
- Hatching cone
- Brine shrimp eggs
- Clean, dechlorinated saltwater
- Air pump and tubing
- Warm water bath, such as a 3/4-filled aquarium, containing water heated to 27-29 degrees C OR environment chamber heated to 25-29 degrees C
- Aquarium heaters for water bath
- A lamp giving off bright light, day and night
- Scrub pad to clean hatching cone
Procedure for hatching brine shrimp eggs
- Scrub the hatching cone to remove any bacterial slime from the sides.
- Fill the cone with salt water, between 10-12 ppt (Note: this low salinity is ideal for hatching brine shrimp, but a higher concentration, 28-32 ppt, is necessary to keep the shrimp alive over 24h, as they will die at lower concentrations). Use a higher salt concentration when rotating cultures. Adjust salinity by adding salt or water, as necessary.
- Insert the air line tubing into the cone and make sure the straw at the end of the air line is inserted into the hole at the bottom of the cone. The water should be bubbling vigorously.
- Place the bright light above the jar and keep on always.
- Eggs should hatch within 24 hr.
Separate the brine shrimp from the eggs
- When hatching is complete remove the air line from the cone and leave alone for about 15 minutes. The empty shells, if present, will float to the top. Unhatched eggs will sink to the bottom. The live brine shrimp (bright orange) will be hovering in the middle.
- You may have to repeat the egg separation step a few times. It is important that we separate as many eggs as possible as they will block the digestive systems of the baby fish, which will cause mortality.
Microworm culture
Materials needed
- microworm starter culture
- a predetermined number of small Ziploc-style plastic containers (anything with a smooth inner surface)
- white bread (continual supply)
- Fleishman’s dry bakers yeast (continual supply)
- a wooden chopstick, toothpick or other suitable feeding utensil
Procedure
- Poke minute holes (up to eight) in each of the Ziploc container lids
- Take a small handful of white bread and moisten it thoroughly. It is important not to soak the bread, nor to leave it too dry. The end consistency should be similar to store-bought hummus dip
- Add a portion of the microworm starter culture
- Mix both the bread and culture well adding water or more bread as needed to maintain an optimal consistency. The mixture should only take up 1/8th to 1/4th of the total volume of the container
- Add enough yeast to just cover half of the surface of the mixture. Do not concentrate the yeast in a single area, but spread it out over the surface
- Adjust consistency of mixture if needed
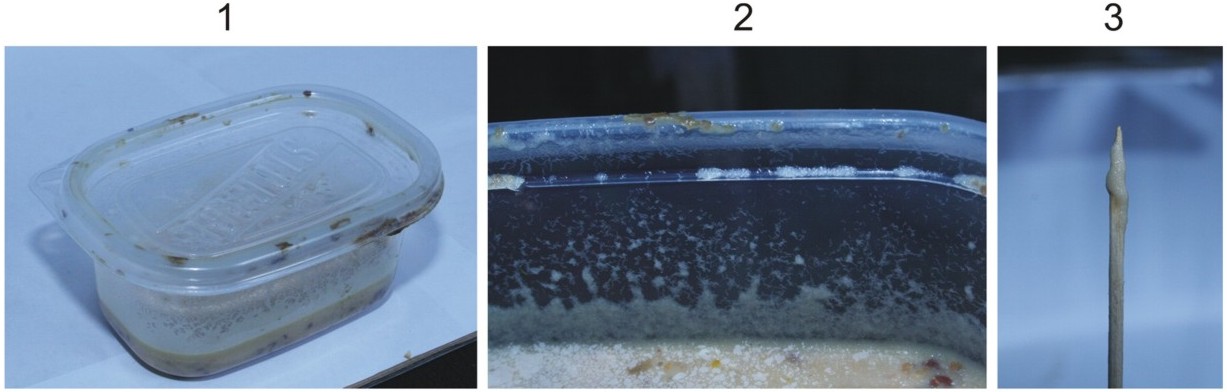
- Place the lid on and the culture in a warm area that is not too dry (see image below)
Feeding
- Allow microworms to build up a layer around the inside surface of the container (figure 2 above)
- Scrape along the inside surface with the chopstick or toothpick in order to pick up the equivalent of 2 rice grains worth of microworms (figure 3 above)
- Dip chopstick/worm combo into the tank containing the fish to be fed
- Dry off chopstick and repeat as necessary
Paramecium culture
Start one as soon as you start making crosses. The easy but less reliable method is to place a pile of hay in a spare aquarium and keep it warmer than room temperature. After a couple of weeks, stir the contents and scoop some of the liquid into a petri dish. With a microscope you should see Paramecium swimming around.
A more reliable but slightly more labor-intensive method, provided by Joey Courchesne, is as follows. It makes 1L of paramecium culture.
Materials needed
- 2L flask
- 2.5g cerophyl powder (wheat grass powder)
- 3/4 g of dibase sodium phosphate powder
- klebsiella starter culture
- large jar (<2L)
- a hotplate
Procedure
- Fill flask with 1L of distilled water
- Measure out 2.5g of wheat grass powder and 3/4 of a gram of sodium phosphate (Sigma Aldrich cat# S-0876) and add to water
- Bring mixture to a boil
- Allow mixture to cool to room temperature
- [optional step] Filter cooled mixture through cotton or nitex to filter out wheat grass particles
- [optional step] Autoclave cooled and filtered mixture
- Inoculate mixture with klebsiella medium (cut off a chunk of the bacteria rich agar and add straight to the mixture; the piece of agar should be about the size of your thumbnail)
- Incubate inoculated mixture overnight (8-12 hours) @ 37 degrees. The high temperature is necessary for proper bacterial bloom
- Pour mix into the large jar and add paramecium culture; or add mix directly to existing paramecium culture for continued rapid growth
- Allow paramecium population to expand for 1-3 days
- Ripe culture should have a paramecium population visible as a “cloud” in the jar. Sufficient population size can be confirmed with a dissection microscope where paramecium presence should be very strongly evident.
- Replenish culture with new food (steps 1-8) every 1-4 weeks as needed
Plan a field trip
These notes are to help plan a field trip. Send me a note if you have modifications!
What to bring to the field
Equipment for shipping fish or eggs
- Coolers
- Oxygen tank
- Battery-operated pumps
- Batteries
- Plastic garbage bags to line coolers so they don’t leak
- Plastic bags for holding fish or eggs
- Elastic bands
- Duct tape
- Falcon tubes & stand
Equipment for preserving fish
- Jars
- MS-222 (buffer with baking soda)
- Ethanol
- Formalin
- Rite-in-the-rain paper
- Pencil
Gear for catching fish
- Traps
- Rope
- Dipnets
- Pails
- Cheese
- Flagging tape
- Rite-in-the-rain notebook
Gear for making crosses and keeping eggs
- Petri dishes (10+)
- Falcon tubes
- Dissecting instruments (2-3 sets of tweezers, scissors)
- Bleach or alcohol
- Egg cups (yoghurt containers with screens)
- Dechlorination stuff (e.g., Prime)
Gear for keeping fish
- Air pumps
- Tubing and air stones
- Power filters
- Dechlorination stuff (e.g., Prime)
- Frozen fish food (for captives).
Clothes
- Rain gear: jacket, pants, hood
- Rubber boots
- Waders
- Life Jackets
Boat gear
- Spare oars
- Rope (required)
- Bailer (required)
- Life jackets (required)
Camping gear
- Tent
- Tarps
- Sleeping bags
- Stove
- Cooking utensils
- Matches
Miscellaneous
- First Aid Kit (should be one in the lab truck)
- Money
- Wet suit
- Rope
- Binoculars
Disinfect traps
To prevent the spread of invasive species and disease organisms we are now required to clean and sterilize all sampling equipment (traps, seines, dip nets, boats, boots, etc.) prior to moving gear between lakes. At minimum we are required to soak gear in a 2% solution of household bleach for 1 minute. I would go longer, maybe 15 mintes. Rinse with local water.
Materials
- Garbage pail or equivalent container (30 gallons or larger)
- Bleach
- Measuring cup
Procedure
- Fill garbage pail with water/chlorine mix to make the disinfectant. Mix about 80 ml of bleach per one gallon (4L) of water. Higher concentration is good.
- Place traps in disinfectant for at least 1 minute (15 minutes recommended)
- Following disinfection, rinse traps and dry before storage
- Disinfect the floats and strings in the same way
Notes
- Make sure you remove any debris from the traps before you bring them back
- If you’re not sure that your traps are clean, it won’t hurt to re-disinfect them
The Great Cheese Debate
When trapping sticklebacks, should a lump of orange cheddar cheese be added in hopes of improving the catch? This is not recommended if you are hoping to examine gut contents because some sticklebacks actually eat the stuff. In other circumstances, however, is cheese recommended? The debate has raged for years in the Schluter lab. McPhail swore by the cheesy approach, Schluter also recommends it, but his lab members are exceedingly skeptical. The question was put to the test for the first time on June 5, 2003, by Nathan Millar and others. The test was carried out in Klein Lake, which has a rather low density of sticklebacks. Minnow traps were placed along the shore where they sat overnight. The results are given below. Each number refers to the count in a single trap (20 traps total).
| Cheese | No cheese | |
| 14 | 0 | |
| 12 | 3 | |
| 0 | 4 | |
| 3 | 3 | |
| 12 | 1 | |
| 23 | 1 | |
| 0 | 3 | |
| 22 | 4 | |
| 0 | 1 | |
| 0 | ||
| 13 | ||
| Mean | 9.6 | 3.0 |
**one of the traps under the no cheese columns had cheese in it, at least initially. A two-sample \(t\)-test after a square-root (+0.5) transformation gave \(t = 1.7386\), \(df = 18\), \(P = 0.0992\). An approximate Wilcoxon test (Mann-Whitney U-test) gave \(Z = 0.9628\), \(P = 0.3357\). Thus, the results are inconclusive. Each camp can continue to hold on to private beliefs, with the assurance that no data (yet!) will prove them wrong.
Lake information
Lake depth maps
- Balkwill Lake
- Enos Lake
- Kirk Lake
- Paq (Lily) Lake
- Paxton Lake
- Priest Lake
- Tom Lake, West Redonda Island
- Download others from the Fisheries Inventory Data Query
Where to trap fish (maps)
Lower Mainland
- Little Campbell River - special permissions required
- Little Campbell River Upper river with Hagen (1967) trapping sites
- Salmon River
- Mike Lake (Golden Ears Provincial Park) - special permissions required
- Murdo Frazer Park (North Vancouver)
- Sproat Lake East
Vancouver Island
- Enos Lake - special permissions required
- Cowichan Lake
- Beaver Lake
Texada Island
- Google Earth view of Texada Island N
- Priest Lake
- Aquatic vegetation map for Priest and Paxton lakes (large file, external link)
- Kirk and Emily (Turtle) Lakes
- How to get to Second Lake
Lakes on other islands
Sechelt Peninsula
- North, Klein, Brown Lakes - special permission required for Brown
- Ambrose Lake - special permissions required
- Paq (Lily) Lake
- Sakinaw Lake
- Oyster Lagoon, Pender Harbor
Transport/ship stickleback
Transport live fish
Keep fish cool in pails or coolers by the lake. Use portable aerators and air stones to keep the water bubbling. Avoid crowding, and exchange the water frequently using lake water to maximize water quality. Keep the water cool, as heat or oxygen stress combined with the stress of transport will cause mortality.
Use sturdy styrofoam coolers to transport the fish. You will need a cooler about 14 inches high if you use soda bottles rather than plastic bags to contain the fish (make sure they are thoroughly cleaned and rinsed to remove all odors). Other items you will need include:
- full oxygen tank, tubing and airstone
- clean robust plastic bags (e.g., buy at Noah’s Pet Ark) and rubber bands, or
- clean 2-litre soda bottles with caps
- freezer packs or ice
- marking pen
- duct tape
Wrap the freezer packs or ice bag in towels or newspaper so that ice and cold packs are not in contact with the water.
Remember that air is more limiting to the fish than water, so use only about 20% of the container for water. Pack the fish into coolers just before traveling back to the lab. Add a few drops of Prime or Amquel to condition the water and remove ammonia. Add about 5 fish per bottle or bag. Bubble oxygen into the water for a minute and then seal bag or bottle tightly. Place bottles vertically into cooler. No more than 40 fish in total per cooler is recommended.
When you get to the lab, open each fish bag and let it float in the aquarium it’s going into. Wait for about 15 minutes so the water in the bag is the same temperature as the fish tank. Every 15 minutes add 1/2 the original water volume of the bag from the aquarium. Do this at least 2 times so that the fish also gets used to the new water parameters. You may have to dump some water out when the bag starts to fill up with water.
Before dumping fish into tank, pour out the fish and water over the sink into a large net. Make sure that you don’t pour any of the lake/stream water into the fish tank as this may carry parasites. Then dump fish into the tank.
Transport eggs/embryos
Transport eggs in falcon tubes placed in sturdy styrofoam coolers to keep them cool and provided with sufficient oxygen. It is easier to transport eggs that were fertilized only 0-2 days previously, because they require less oxygen than older embryos. Other items you will need include:
- full oxygen tank, tubing and airstone
- falcon tubes
- stand or other device to hold falcon tubes upright
- freezer packs or ice
- marking pen
- duct tape
Wrap the freezer packs or ice bag in towels or newspaper so that the tubes containing the eggs are not in contact (contact will chill the eggs and cause mortality). Place the wrapped pack or ice along the bottom or on one side of the cooler.
Make sure the eggs are rinsed clean and that testes and other tissues have been removed. Place one clutch of eggs into a single falcon tube half-filled with clean lake water (preferable) or dechlorinated tap water. Place the airstone into the tube and bubble oxygen into the water for a minute. Remove the airstone and then cap it tightly. Place bottles vertically into cooler (best if you have a stand for this purpose). Secure the tubes so that they do not slide or tip during transport.
Ship live fish or eggs by air
Ship on Monday to avoid a weekend disaster if the shipment is delayed by customs, weather, or airport issues.
If you are shipping internationally, specimens might get held up at customs. If this happens, contact UBC’s customs broker, Livingston, to facilitate (link has contact information). UBC’s account number with Livingston is 328578. Also give them a speed chart for any charges.
If you are shipping internationally, make sure the receiver has sent you the appropriate importation documents to include. Also print and fill out THREE copies of the Commercial Invoice form. Finally, Ask Dolph to print and sign THREE copies of the letter of declaration. An example letter is available here. Leave the box in Stores.
Check our oxygen tanks a few days before shipping and fill if empty. See link on this page for instructions on how to fill the oxygen tank.
Starve fish for one or two (preferable) days before shipping.
Pack fish and eggs for shipment following the instructions above for transporting fish and eggs from field to lab. Adding one teaspoon of activate charcoal per bag of fish is recommended. Double-bag fish, and DO NOT over-inflate bags or they will burst in transit.
Give yourself at least an hour preparation time for EACH cooler of fish being sent (assuming that you’ve prepared other items ahead of time: plastic bags, freezer packs, labeled boxes for coolers, full oxygen tank). You’ll need more time if you’re sending more than one type of fish and need to organize them while you’re packing.
Fedex Instructions
Obtain a waybill form from Zoology Stores the day before and fill out. Call FedEx and confirm an approximate pickup time.
Air Cargo Instructions
Book the fish onto a flight 48 hours before. Look up the flight number ahead of time.
The Air Canada booking number is 1-800-387-4865. Use the UBC account number to book (145121), but bring a credit card to pay for the shipment when you drop off the fish. When you book, the airline will want to know the number, size and weight of the packages, and your name and address. They might want to know the name and address of the recipient at this time. They will give you a tracking/waybill number at the time of booking. The recipient will need this information 48 hours prior to arrival or their Customs may not release the package in time to save the fish.
Air Canada Cargo is at 4900 Miller Road at the Vancouver International Airport. Bring the fish to the cargo office the night before the flight, or in the morning at least 3 1/2 hours prior to flight time. Customs will want to view the fish before the cooler and boxes are taped, so keep them untaped until then. Cargo might want the cooler in a box or wrapped in sturdy paper (ask). They will not accept a plain styrofoam cooler for fear of puncturing it during transport. Put stickers on the box to indicate which end is up, so that the contents aren’t inverted during transport. Make sure the statements “Live Fish” and “Do not refrigerate” are clearly written on the box, so that they expedite and so that they do NOT store the parcel in their 3°C cold room before transport. Tell them that room temperature is fine.
Bring the following information and documentation to the airport.
- Government-issued photo ID, with your name and address (e.g., drivers license).
- The name, address, and phone number of the person receiving the fish (remind the recipient to bring government-issued photo ID to the airport when they pick up the fish).
- A declaration of importation for the US Fish and Wildlife Service. Get the recipient to fill this out and fax to you before you go to the airport.
- Two copies of a letter from Dolph to US Agriculture, listing the contents of the container.
- Copies of the permit under which the fish were collected. You may not need them, but the cargo people sometimes want to include documents that the fish were collected legally.
The specific instructions above assume you are shipping to the USA. Modify accordingly if shipping to another country.
Ship dead specimens
These instructions apply when shipping to the USA. Modify accordingly for other countries.
We use DHL to send fish specimens, tissue, and DNA. The procedure is similar as for an ordinary package, but with a bit more documentation.
- Drain all alcohol or other preservative from the specimens and pack them into a sealed box, such as a tupperware container. In the case of fish specimens, line the box with damp towels to prevent them drying out.
- Print two copies of a letter from Dolph to US Agriculture, listing the contents of the container.
- Print and fill out TWO copies of the Commercial Invoice form.
- Go to Stores and ask about how to ship.
- To track a package, go to the DHL web site.
Ship stuff on dry ice
These instructions apply when shipping to the USA. Modify accordingly for other countries.
We ONLY use FedEx, because the other couriers have restrictions on shipping dry ice. Leave enough time in the day for you to pack up the box and have FedEx come and pick it up from Botany/Zoology Stores.
Ship only on Monday to avoid a weekend disaster if shipment is delayed by customs, weather, or airport issues.
If you are shipping internationally, specimens might get held up at customs. If this happens, contact UBC’s customs broker, Livingston, to facilitate (link has contact information). UBC’s account number with Livingston is 328578. Also give them a speed chart for any charges.
Get a cardboard box and a styrofoam box that sits neatly inside with little free space (fill any free space with scrunched up newsprint to minimize jostling of samples). To find a matching styrofoam and cardboard box look around labs that frequently buy enzymes, such as NAPS or the Qaigen stores on the 3rd floor of the North wing of the Biological Sciences building.
Place the appropriate labels on the outside of the cardboard box. The appropriate labels include:
- The shipper’s address and contact info. This is us.
- The receiver’s address and contact info.
-
At least one (2 or 3 is best) dry ice warning stickers (see image
below). Please make sure that you do not write on the stickers as they
MUST not be written on. The best place to put the stickers is in the
middle of the shipping box.

The stickers may be purchased from Botany/Zoology Stores. They are located just above the biohazard waste disposal cards next to Scott’s office. Or, download and print the warning label and tape it onto the box. Just make sure that it’s a large and clear copy of the warning label. - Write the code UN1845 on the box next to the dry ice warning label (see image above). This tells the shipper that it’s dry ice.
- Write the total weight of the dry ice used in the shipment next to the dry ice warning sticker (see image above). This MUST be written in kilograms and NOT in pounds.
Get your dry ice (instructions on getting dry ice below). I’d suggest getting at least 1 kg of dry ice but no more than 3 kgs.
Obtain a FedEx EXPANDED SERVICE INTERNATIONAL AIR WAYBILL from Stores and fill it out as shown here in an example. Please DON’T get the regular INTERNATIONAL AIR WAYBILL as it won’t have the section needed for a dry ice shipment. Our FedEx customer account number is 359397682.
Print and fill out THREE copies of the Commercial Invoice form.
Ask Dolph to print and sign THREE copies of the letter of declaration. An example letter is available here.
Place the samples into the dry ice and close the styrofoam box securely. Tape the cardboard box shut.
Tape a plastic window envelope to the top of the box. Combine each of the three copies of the Commercial Invoice form and signed letter of declaration and place them with the EXPANDED SERVICE INTERNATIONAL AIR WAYBILL into the window envelope. Example is seen here.
Leave the box at our shipping/receiving office. Call FedEx and tell them the package is ready for pickup.
Get dry ice
If you really want to be thrifty, you can stop by NAPS or any enzyme-selling lab and ask if they have any free dry ice. Otherwise you’ll have to buy it.
To purchase, make sure you know the speed code to pay for the dry ice. If you don’t know it, please ask Dolph.
Obtain a styrofoam box with lid. Bring it to Chemistry Stores (corner of Main Mall and University Blvd), located across the street and just north of the Biological Sciences building. Once you enter the Chemistry building, directly in front on the right is the stairs which you take down to the bottom floor. Walk East down the hallway. You’ll walk along a wall of lockers and will soon see the entrance of the Chemistry stores.
You must first weigh your box before placing the dry ice inside (I measure it in kilograms). Ask the attendant for the keys for the dry ice room (the dry ice room is located next to the stairs you came down). Get your ice, and weigh the box again and figure out the total weight of dry ice taken. Record the amount in the dry ice book in Chem Stores.
Note that Chem stores closes for lunch between 11:30am and 12:30pm.
Fill the oxygen tank
- Call Praxair 604-527-0710 to order oxygen. Our customer no. is HU839. They will ask for a credit card number so please make sure you have it before calling.
- Tell them you want medical grade O2 in small bottle size and tell them the quantity.
- Let them know if you have any empty tanks for pickup. The delivery guy drops off full tanks and picks up empty ones. Drop off the empty O2 cylinders outside, next to Zoology Stores, next to the large gas cylinders. Tear off all the old tags.
- It usually takes 2-3 days before they arrive. They will drop off the filled cylinders in the same area when you dropped off the empty tanks.
- If you need to speak to our sales rep for Praxair, his name is Alan Sechinko and he can be reached at 604 619 6420.
Tag stickleback
Elastomer tagging
This section explains how to tag threespine stickleback safely and effectively using elastomer.
Materials
- MS-222 (Tricaine Methane Sulfonate)
- Sodium bicarbonate (baking soda)
- Spatula
- 1000 ml glass beaker
- pH test kit
- Holding tank and recovery tank
- Air supply and air stone
- Tagging kit including syringe and elastomer (e.g., Northwest Marine Technology)
Procedure
- Fast fish for 12-24 hours prior to tagging. This will reduce fecal contamination and risk of regurgitation.
- Maintain adequate oxygenation via air stone in both holding and recovery tanks.
- Use water from the original source tank for transport, anesthetic, and recovery. If using another water source, closely duplicate the water quality parameters (e.g. temperature, pH, hardness, etc.).
- Maintain water temperature at the species’ normal optimum during both the anesthesia and recovery period.
- Make a desired volume of MS-222 solution in the beaker (concentration of 50-75mg/L) and buffer the solution to pH of 7-7.5 with sodium bicarbonate. Wear protective clothing, gloves, and goggles when handling MS-222 powder. If possible, work inside a fume hood to prepare solution.
- Anesthetize the fish in the MS-222 solution. Before tagging, make sure that the fish has slow respiration and heart rate, and is nonresponsive to stimuli. Observe the movement of the operculum as it opens and closes to assess rate. If respirations become extremely slow or stop, place fish in the anesthetic-free recovery water until respirations resume.
- To inject a tag, insert the syringe needle into the marking location (~1cm or less and just under the skin). Slowly withdraw the needle as the material is injected, so that a long narrow mark is created. It is important that the tag created is fully contained within the target tissue.
- Once tagged, place fish into recovery tank to recover.
Additional notes
- To begin, anesthetize a few fish and follow them through full recovery to ensure drug dosages and techniques are safe and provide sufficient anesthesia.
- Dispose of MS-222 waste by flushing down the drain to a sanitary sewer with an excess of water.
- If in a remote location where a sewer may not be readily available, further dilute the solution with water and dump wastes on land in a location away from water.
- Do not discard MS-222 directly into surface water, storm water or catch basins.
- MS-222 is a light sensitive chemical and should be stored in a dark container or in a cabinet/drawer.
RFID tagging
This section explains how to insert an RFID tag into a three-spined stickleback safely and effectively.
Materials
- Melafix (fish medication)
- AmQuel or other water conditioner/detoxifier
- Methylene blue and tea tree oil
- MS-222 (Tricaine Methane Sulfonate)
- Sodium bicarbonate (baking soda)
- RFID tags, 8 mm (should be 30 in a packet).
- MK-7 Implanter
- Surgical blade
- 1000 ml glass beaker
- pH test kit
Procedure
- Set up a 100-L aquarium that is completely cycled. Add about 4 mL Melafix, 2 mL of AmQuel, about half a cup of kiln-dried salt, and several drops of methylene blue and tea tree oil.
- Wear protective clothing, gloves, and goggles when handling MS-222 powder. If possible, work inside a fume hood to prepare solution. Mix a desired volume of MS-222 solution in the beaker at a concentration of solution of 0.3g/L. Buffer the solution to pH of 7-7.5 with sodium bicarbonate (will require about 1-2 times the amount of MS-222 added).
- Set up multiple containers of about 1 L to hold up to 3 fish immediate after tagging. Fill containers with dechlorinated water of room temperature (e.g., use the water we have in the tubs for water changes). Add a drop of tea tree oil.
- Wipe down work surface with 95% ethanol, and fill a small dish up with 95% ethanol. Put two clean paper towels on the work surface. Put a sharp pair of scissors, the needle portion of the MK-7, tweezers, and all tags to be placed in fish into the ethanol-filled dish. After several minutes, remove objects and place them on one paper towel to air dry.
- Place a single fish in the MS-222 solution until it reaches until fish reaches stage four of anesthesia (total loss of muscle tone and equlibrium; slow but regular opercular rate; loss of spinal reflexes). This will take about 1 minute for a stickleback of 5-6 cm. Stir the MS222 solution to check the fish’s equlibrium. The rate at which the pectoral fins beat is a good indication of muscle tone.
- While fish is being anesthetized, put on a clean pair of latex gloves. Use tweezers to load the glass RFID tag into the MK-7 implanter, being careful to get the tag all the way in.
- Gently remove the fish from the MS-222 solution using a large pair of tweezers and place on the second clean towel. Take the clean, air-dried scissors and make a small incision on the side of the fish, just under the lateral line and about a centimeter behind the pectoral fin. If the fish has lateral plates, the incision may need to be lower.
- Insert the loaded MK-7 implanter into the incision with the needle opening facing you, and with the point aimed toward the tail. Continue until 3/4 of the needle opening is within the incision. Keep the implanter as close to the dermis as possible as you insert. Then, rotate the implanter 180 degrees so that the needle opening is facing the fish. Push the plunger to insert the RFID tag. Once the tag is partially in the fish, pull out the implanter as you push the plunger further to minimize unnecessary penetration. Place tagged fish in the prepared 1-L container.
- Put scissors and tweezers back into the ethanol, as well as a fresh needle. Replace paper towels and latex gloves.
- Repeat steps 4-9 until all fish are tagged.
- Gently transfer all fish to the prepared 100-L aquarium, while wearing a fresh pair of gloves
- After 24 hours, add another dose of Melafix to the aquarium water. After 3 days, replace 25% of the water in the tank.
- Feed the newly tagged fish juvenile food for three days. Then switch to regular adult food.
Euthanasia
This section explains how to euthanize threespine stickleback safely and effectively.
Materials
- MS-222 (Tricaine Methane Sulfonate) (check expiry date)
- Sodium bicarbonate (baking soda)
- Forceps or long tweezers
- Spatula
- 1000 ml glass beaker
- pH test kit
Procedure
- Wear protective clothing, gloves, and goggles when handling MS-222 powder. If possible, work inside a fume hood to prepare solution.
- Make a desired volume of MS-222 solution in the beaker (concentration of 0.5g/L). Buffer the solution to pH of 7-7.5 with sodium bicarbonate (0.5-1 g/L).
- Place fish in the solution and wait at least 15 minutes, to ensure that death is achieved. Verify before disposing or preserving the carcass by monitoring the absence of respiratory or opercular movement for at least 3 minutes.
- Use tweezers to remove the fish from the solution.
Additional notes
- Dispose of MS-222 waste by flushing down the drain to a sanitary sewer with an excess of water.
- If in a remote location where a sewer may not be readily available, further dilute the solution with water and dump wastes on land in a location away from water.
- Do not discard MS-222 directly into surface water, storm water or catch basins.
- MS-222 is a light sensitive chemical and should be stored in a dark container or in a cabinet/drawer.
Preserve, stain, measure
This page describes how to euthanize, stain, and measure fish.
Preserve fish
In 95% ethanol
The advantage of this method is preservation of DNA. However, formalin fixes the tissues best for measurement.
- Euthanize fish with a lethal dose of MS-222 (see above).
- Make sure that the fish are not too crowded in the jar or the water contents of the fish dilutes the ethanol.
- Seal jar cap with parafilm to minimize evaporation.
- Jars may need top-up every few years to compensate for evaporation.
In 10% formalin
Warning: It is difficult to extract and amplify DNA from fish preserved in formalin. It is best to set aside a sizable sample of tissue to preserve in 95% ethanol before the fish goes into formalin.
- Euthanize fish with a lethal dose of MS-222 (see above).
- Always use formalin a fume hood.
- Dilute formalin to 10% corresponding to 3.7% formaldehyde (100% formalin is 37% formaldehyde).
- Place fish in formalin solution. Make sure that the fish are not too crowded in the jar or the water contents of the fish dilutes the solution.
- Allow the specimens to fix in the formalin for about two weeks before measuring.
- For long term storage, seal jar cap with parafilm to minimize evaporation. Jars may need top-up every few years to compensate for evaporation.
Stain fish
Stain fish preserved in formalin with alizarin red
Warning: the procedures below will destroy DNA of the sample.
- Rinsing (1): Strain formalin into receptacle. Rinse fish in water for 24 hours. Dispose of the formalin safely.
- Staining with alizarin red: Add four pellets of KOH to 100ml of water to which you add enough alizarin red powder to turn the solution purple (“Welch’s Grape Juice” color). It should be just fine as long as the amount of KOH used is less than 0.5g per 100ml . Place the rinsed fish (pour rinse water through strainer) into this alazarin red solution. Stain for 24-48 hours (time may need to be adjusted depending on size of fish, etc.). Mix the vials of stained fish every few hours to maximize dye exposure.
- Rinsing (2): Strain KOH/alizarin red solution into receptacle. Rinse fish well with water, up to 24 hours. This will usually clear away any stain picked up by non-bony tissues. Dispose of the KOH/alizarin red solution safely.
- Storing: Store rinsed fish in 40% isopropyl alcohol. We usually get our isopropyl alcohol from the fish museum.
Fish are now ready to be measured or kept in storage. Seal the jars with parafilm to minimize evaporation. Check fluid levels in jars every year or so.
Stain fish preserved in ethanol with alizarin red
Warning: the procedures below will destroy DNA of the sample.
- Rinsing (1): The fish will need to be transferred gradually to a water-based solution, otherwise the little bodies fly apart. From 95% ethanol, transfer to 70% ethanol for 24 hrs; 50% ethanol for 24 hrs; 20% ethanol for 24 hrs; tap water 24 hrs.
- Formalin step: Transfer rinsed fish into 10% formalin for 48 hours. Always use a fume hood when pouring formalin.
- Rinsing (2): Pour out the formalin and rinse the fish in water for 24 hours.
- Staining with alizarin red: Add four pellets of KOH to 100ml of water to which you add enough alizarin red powder to turn the solution purple (“Welch’s Grape Juice” color). It should be just fine as long as the amount of KOH used is less than 0.5g per 100ml . Place the rinsed fish (pour rinse water through strainer) into this alizarin red solution. Stain for 24-48 hours (time may need to be adjusted depending on size of fish, etc.). Mix the vials of stained fish every few hours to maximize dye exposure.
- Rinsing (3): Strain KOH/alizarin red solution into receptacle. Rinse fish well with water, up to 24 hours. This will usually clear away any stain picked up by non-bony tissues. Dispose of the KOH/alizarin red solution safely.
- Storing: Store rinsed fish in 40% isopropyl alcohol. We usually get our isopropyl alcohol from the fish museum.
Fish are now ready to be measured or kept in storage. Seal the jars with parafilm to minimize evaporation. Check fluid levels in jars every year or so.
Staining armor on live adult fish using calcein
Provided by Pam Colosimo.
REAGENTS: Calcein (Sigma # C0875). Calcein is a fluorescein-iminodiacetic complex that fluoresces green when combined with calcium. Examination for fluorescence can be carried out under UV microscopy in the usual manner for green fluorescence. Use the Nikon dissecting microscope in the lab - it has a mercury bulb UV light source. The filters are the same for observing GFP.
- Make 10 mg/ml (100X) Calcein solution in dH20. Cover this solution with tin foil. I have been storing this at 4 C for a month and it is still fine.
- Place adult fish in a beaker of fish tank water. (We use .35% Instant Ocean formula in dH20.) Since calcein binds calcium phosphate, it is important not to use water that contains that salt). I put one fish in 100 ml of fish tank water, but you can probably fit up to 5 fish in there. Add 1 ml of the 100X solution.
- Cover beaker with foil and leave for 3-4 hours. If you are in a rush, the fish will be stained within 1 hour, but it might be difficult to see all of the plates, especially the most anterior plates. I left one fish swimming in the solution overnight and the staining looked great.
Measure fish
There is some variation in how these traits are measured, and it is best that all fish be measured by the same person to ensure consistency.
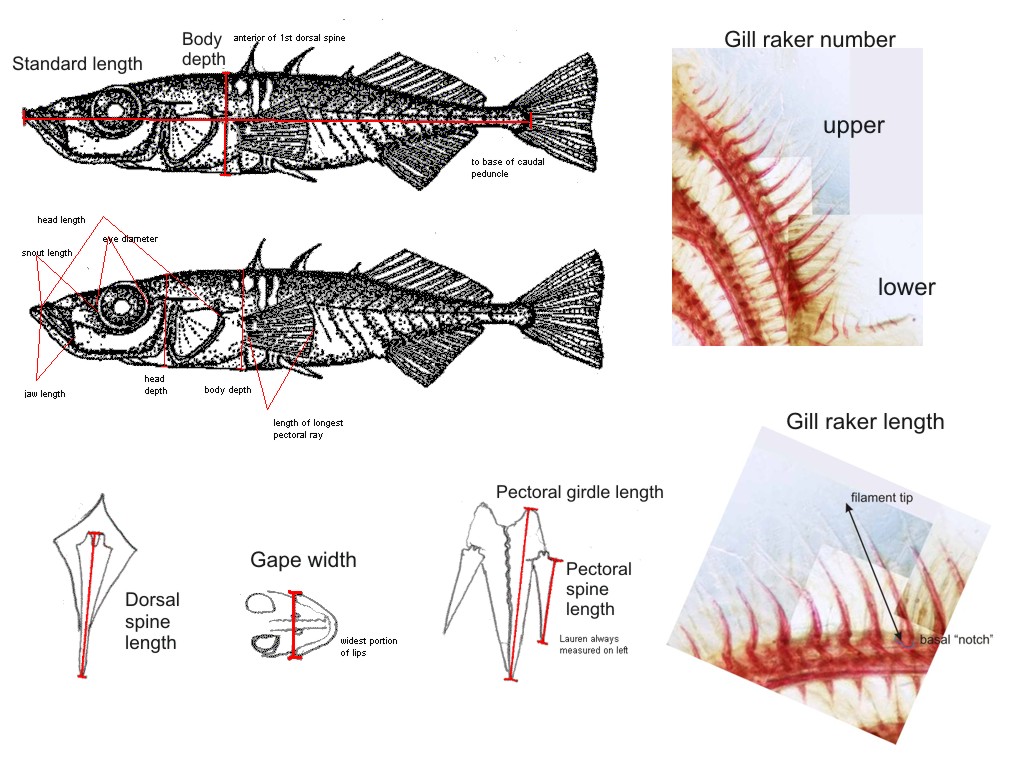
Basic measurements
Measuring shape using landmarks
- To measure shape of stained fish, use the high-quality Nikon camera, which has a lens with a flat field. Camera settings are here
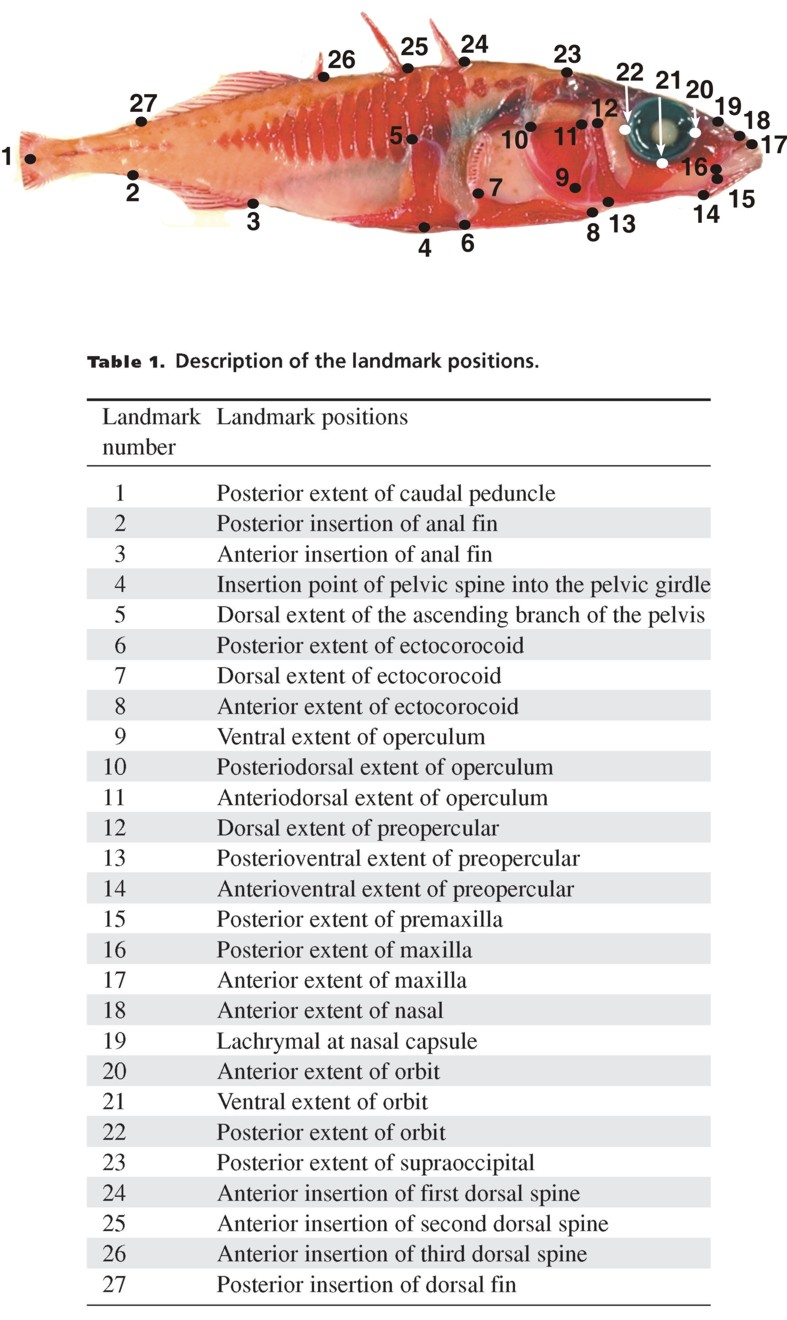
- Most of the landmarks we use were described in the paper by Albert et al (2008). An illustration of the landmarks is here.
- These landmarks were based on turn on those used by Walker (1997), illustrated here.
- Caldecott & Adams (1998) used the following skull landmarks
Measuring lipids
These methods were contributed by Karl Heilbron, and are based on Post and Parkinson (2001, Ecology 82:1040–1051) and Folch et al., (1957, J. Biol. Chem. 266:497–509).
- Dry the fish in a drying oven and then weigh.
- Homogenize dried sample with a mortar and pestle, then transfer to the tared cap of a 50mL Falcon tube. Reweigh (some loss occurs during the homogenization process, ~10%).
- Tip contents into labeled Falcon tube. Add 8mL methanol and 8mL chloroform.
- Bring solution to a boil in a 61 deg C water bath (~5 minutes) (coat hanger contraptions hold tubes in the water bath). Let cool to room temperature in fume hood.
- Top up to 25mL with chloroform and allow the sample to settle.
- Filter solution through No. 1 Whatman filter paper into a separatory funnel. (Wash filter paper with 10mL 0.9% saline).
- Cap and vigorously shake separatory funnel. Uncap and let sit for ~15+ minutes while phases separate. The longer you give them, the better. Drain bottom organic layer into a pre-weighed beaker. (Rinse separatory funnel between extractions using a scrubbing brush but no soap.)
- Boil off organic layer with a hot plate set to 70 deg C. Allow beaker to cool to room temperature.
- Weigh beaker containing lipids.
© 2009-2026 Dolph Schluter