Overview | |
|
Our protocol for generating deletion mutations is based on the procedures of Bob Barstead and Gary Moulder at the Oklahoma Medical Research Foundation in Oklahoma City. The procedure is to mutagenize a large population of worms with trimethylpsoralen and UV irradiation, set up 1152 subpopulations, screen DNA made from this library for deletions in specific genes by nested PCR, and then to recover single worms carrying the deletions through a sib-selection process. We have made various modifications to the original protocol, specifically with regard to library complexity (100,000 genomes versus 500,000 to 1,000,000) and screening strategy (the use of poison primers to increase sensitivity of detection for small deletions).
This procedure is not terribly complicated, but it does require great care at every step to ensure that detected mutations can be recovered. Our libraries are not frozen, as we have more genes on our request list than we can search for in a single library's DNA, and our throughput is such that we can screen until the DNA is used up in about three weeks. DNA is made by a simple proteinase K lysis, and pooled so that the 1152 populations can be screened in 96 reactions. We do a lot of our PCR work in 384-well plates to save time and materials, but everything can be done in 96-well plates if you don't have access to 384-well equipment. 10 µl reactions work fine in 96-well plates, and don't require nearly as much Taq. To date we have done most steps with worms grown on solid media, but we have shifted some steps to growth in liquid and continue to explore making the whole library in liquid culture. The following sections lay out the protocol in fair detail, and other sections of this site contain our PCR protocols, recipes and materials lists. If you have questions about anything that we have not covered, please be sure to contact us (). | |
Library Construction | |
|
We use our own subculture of the wild type (N2) to make mutagenized libraries. To minimize accumulation of spontaneous mutations in the stock, it is re-established from a single animal and grown to a density suitable for library inoculation before each library is built.
Worm growth and synchronization for library construction follows a schedule intended to make major events fall on regular work days. The timing of some steps is important, but that of certain others (indicated in the text) may be adjusted to fit your schedule without detrimental effects. | |
| Initial setup | |
| Day 1 (Wednesday) | Wash two or three 60 mm plates of growing mixed-stage worms with sterile M9 buffer, pellet by low-speed centrifugation in a sterile 15 ml conical centrifuge tube (2000 RPM/1 minute), and distribute with a sterile Pasteur pipette to three 150 mm RNGM plates spread with a lawn of E. coli OP50 (three spots of worm suspension per plate). |
| Synchronize | |
| Day 3 (Friday) | Synchronize population by egg prep, following the procedure in Barstead, R.J. (1999), Reverse Genetics in C. elegans: A Practical Approach (I.A. Hope, editor, Oxford University Press, NY. 1: 97-118). Distribute harvested eggs (or killed and washed gravid adults) to one or two unseeded 150mm plates. The eggs will hatch, and the L1 larvae arrest development until put onto food. |
| Transfer to food | |
| Day 5 (Sunday) | Wash L1 larvae off plates with M9 buffer, pellet in a 15 ml centrifuge tube, remove supernatant by centrifugation and distribute with a sterile Pasteur pipette to 10 seeded 150 mm plates. Place at 15º C and allow to develop to young adulthood (two days). |
Mutagenesis | |
| Day 7 (Tuesday) | Wash worms off all plates with M9 buffer, pellet in 15 ml centrifuge tubes, and remove supernatant by aspiration. Wash with fresh buffer several times to remove most bacteria. Resuspend worms in one or two 1-ml aliquots of M9 buffer and transfer each aliquot to a single well of a 12-well untreated tissue culture plate (Evergreen #222-8046-01F). Add 6.7 µl TMP working stock (0.3 mg TMP/ml acetone) to each 1 ml suspension of worms (final concentration 2 µg/ml). It's best to do this in a fume hood, probably under dim light. It's a little hard to see, but if you get the right angle you can see when the TMP goes in because the acetone makes the surface of the worm suspension sheet from one side to the other in a peculiar way. Incubate the worms in the dark for one hour at room temperature, with occasional gentle shaking. We do this in the fume hood, with the plates in a lightproof box. While the worms are incubating in the TMP, set up the irradiation apparatus. We irradiate with a dissecting microscope fitted with a Kramer fluorescence illumination unit and a UV filter set (360/40 nm). Turn the lamp on at least 15 minutes prior to irradiation to give it time to warm up while you are adjusting the light intensity and field of illumination. Remove the objective and adjust the height, zoom and focus so that the field of illumination is slightly larger than the well the worms are in (use an empty 12-well plate, with the filter set turned to one of the GFP settings so you can see the circle of light). Elevate the plate to the same height as the window of the UV dosimeter on a stable support. We use a styrofoam tube rack for this - it helps to draw an outline of the tissue culture plate on the rack and a circle exactly where the well with worms will be, so you can put the worm well directly in the right place at irradiation time without a lot of fussing. Once the size of the field is set, replace the support and plate with the UV dosimeter, center the circle of illumination on the window with the filter set still on the GFP setting, then change the filter to the UV setting and adjust the height of the head until the intensity is 340 microwatts per square centimeter. The adjustments required are usually small and won't significantly change the size of the illuminated circle. It's good to check the UV intensity a few times while the worms are incubating, as the lamp intensity tends to drift over time. Once you're happy with everything, change the filter set back to GFP, replace the dosimeter with the support and plate and realign it for even illumination of the correct well. Carefully remove the empty plate without disturbing the support, put the lamp blocking slide in place, and turn the filter set back to UV. After the worms have soaked in TMP for one hour, remove the plate lid, carefully place the plate with worms in position on the support, and irradiate for 90 seconds at 340 microwatts per square centimeter (use the lamp blocking slide to control irradiation). You can leave the room light on for this. After irradiation, transfer each worm/TMP mix to a microfuge tube and pellet. A 10-second spin at 10K rpm is usually sufficient. Remove the pellet from under the supernatant with a Pipetman (200 µl), and distribute at three dots of worms per plate to each of five or six seeded 150 mm plates. We use one tube of pelleted worms for each set of five or six plates. (You'll discard some worms, but five to 10 150mm plates is LOTS of mutagenized worms. Don't sweat it.) Put the plates in the dark at 20º C to 22º C overnight to recover. |
| Synchronize and set up to screen for mutations in unc-22 | |
| Day 8 (Wednesday) | unc-22 is a large gene that makes a good test target for mutagenesis. Mutations that knock out unc-22 produce a dominant "twitching" phenotype when the animals are exposed to 1% nicotine. The presence of twitchers among the progeny of a mutagenized population is a good assay to indicate that the mutagensis was successful. After 24 to 36 hours, set up 25 60mm plates with three mutagenized adults each. Typically we screen for twitchers before harvesting for the DNA prep. You should see twitchers on at least half the plates. If we see twitchers on fewer than seven or eight plates, we throw the library away and start again.
Immediately after the P0s are picked for the twitcher screen, synchronize the remaining P0s by egg prep and put the eggs on a fresh set of 150mm plates. |
| Set up library | |
| Day 10 (Friday) | The F1s should starve the plates just as the first F2 eggs are being laid. Collect the worms by standard washing and pelleting, and dilute with fresh M9 buffer to desired concentration in 50 ml centrifuge tubes. Set up library by distributing 50 worms per well to 1152 wells in 12-well untreated tissue culture plates containing low-EEO agarose and lawns of OP50 (96 12-well plates, numbered sequentially). We use Nichiryo Model 8100 repeat pipetters fitted with 3.0 ml syringes for this, delivering 50 µl of worm suspension per well (1 worm/µl). It's not a terribly accurate method, but it works well enough for library construction and it's fast: one person can dispense the library in a couple of hours. |
| Harvest library | |
| Days 15-17 (Wednesday to Friday) | Accuracy at this stage is essential! Each worm well must be sampled into the correct digestion well or addressing will become impossible and you will waste all your time, effort and materials! The actual time of harvesting depends on the worm plates – harvest when the wells have just starved. Prepare 12 96-well 200 µl PCR plates, labeled A through L with rows numbered 1-8 and containing 50 µl Proteinase K buffer in each well. Harvest each worm well in order by putting on 200 µl of harvest solution (sterile deionized water containing Nystatin and streptomycin), removing 50 µl and placing into the Proteinase K buffer in a digestion plate well. There are several concepts and tricks that will help you do this properly.
The concepts:
The tricks:
Once you've harvested a digestion plate full (eight 12-well plates), put on a silicone mat lid and place at – 70ºC for about a half hour or until all the wells have frozen completely. You may leave them at – 70ºC for any length of time without causing any trouble. Transfer the plate to a 96-well PCR machine, incubate at 65ºC for two hours, then run the temperature up to 95ºC for 20 minutes to inactivate the Proteinase K. Store digested plates at – 20ºC until all plates are finished. |
| Pool DNA for screening | |
| Day 20 | Thaw all digestion plates and add 100 µl sterile deionized water to each well with a Robbins Hydra 96 (be sure to bleach and wash syringes between plates; the bleach solution is household bleach diluted 1:50, and the washes are done with sterile distilled water). Spin cell debris to bottom of wells (2000 RPM/2 minutes). Pool by sampling 75 µl from each well of a plate with the Hydra and dispensing 70 µl into a sterile 8-channel pooling block (this looks like a tiny little swimming pool with 8 horizontal lanes and a deep end). Mix the DNA well by rocking the block back and forth several times, then allow the mix to collect in the deep end. There should be 840 µl total. Aliquot this mix into a single column of four new 200 µl polypropylene deep-well PCR plates, using an 8-channel pipetter. The mixed samples from digestion plate A should go into Column 1, B into Column 2, and so on. These four plates are labeled CP-1 through CP-4, sealed with clean sterile silicone mat lids, and stored at – 20 º C until time to sample them for screening reactions. ("CP" means "column pool," which is kind of a misnomer since it is really rows of samples that are pooled. It just means that each plate is sampled into a single column of wells.)
Plate CP-4 and the original individual digestion plates should be sealed with mat lids and stored separately from the other three CP plates at – 20ºC, and not touched again until time for row tests (see below). |
Screening | |
| Begin on Day 21 | We carry out screening reactions (10 µl total volume each) in 384-well polypropylene PCR plates, using 2 µl of input DNA sampled from the column pool plates. Alternatively, you can do 25 µl reactions with 5 µl of input DNA in 96-well plates, but the number of possible genes screened for will be smaller. This amount of DNA (in three column pool plates) allows us to screen for deletions in approximately 250 genes or intervals. At our current capacity, we screen the library for deletions in 20 intervals per day, so screening the whole library is finished in less than three weeks.
See our standard 10 µl PCR protocol for recipe and cycling details, for both standard 3 kbp intervals without poison primers and smaller intervals with poison primers. All reactions use nested primers – external primer reactions are set up using column pool DNA, and a small amount from these reactions is used to inoculate the internal primer reactions. Each 384-well plate will accommodate 96 reactions for each of four different screening intervals. Assemble a master mix of sufficient volume for the whole plate (or plates) and containing all components except primers and DNA in a 15 ml sterile centrifuge tube and keep on ice; remove one-fourth of this mix at a time, mix with appropriate forward and reverse primers, and pipette into wells of the PCR plate using a 12-channel pipette. (The wells of a 384-well plate are arranged in quads, so that master mix for one primer set goes into the upper-left well of each quad, and so on.) After the plate is filled, centrifuge the mixes to the bottoms of the wells (1000 RPM for a few seconds). Add DNA to each well using the Hydra. We sample enough DNA from a column pool plate to set up however many plates of master mix that have been assembled in one go, with a few microliters extra. A plate rotater allows the DNA to be dispensed from 96 sampling syringes into 384 wells. Each finished plate is sealed with a transparent plastic sealing film before cycling. After external-round cycling, prepare a second 384-well plate with internal primer master mixes in the same manner. We sample 2 µl from each set of 10 µl reactions, dispense 0.2 µl into the internal round master mix, and empty the remainder back into the external plates. Wash syringes once with dilute bleach and several times with two changes of sterile distilled water between primer sets. Washing is time-consuming, and the sampling procedure could be speeded up by use of a 384-syringe Hydra. After internal-round cycling, remove the sealing film, add 10 µl of loading buffer, replace the sealing film and press it firmly back into place, and vortex the plate on each edge to mix thorougly. Centrifuge briefly to move everything back to the bottoms of the wells. We resolve the PCR products on 2% agarose gels in 1X TBE, stain with SYBR Green and image with a Molecular Dynamics Fluorimager. This system is very sensitive and allows us to load only 1 µl of the reaction/loading buffer mix. Standard ethidium bromide staining and video camera imaging can also be used, but sensitivity is much lower and requires more of the mix to be loaded. |
Row and Well Testing | |
| Primary library screening typically results in lots of apparent deletion bands, few of which turn out to be real (in terms of deletions actually recoverable from the library). To avoid a lot of wasted sib selection effort, we subject each putative deletion to multiple confirmation tests before proceeding to sib selection.
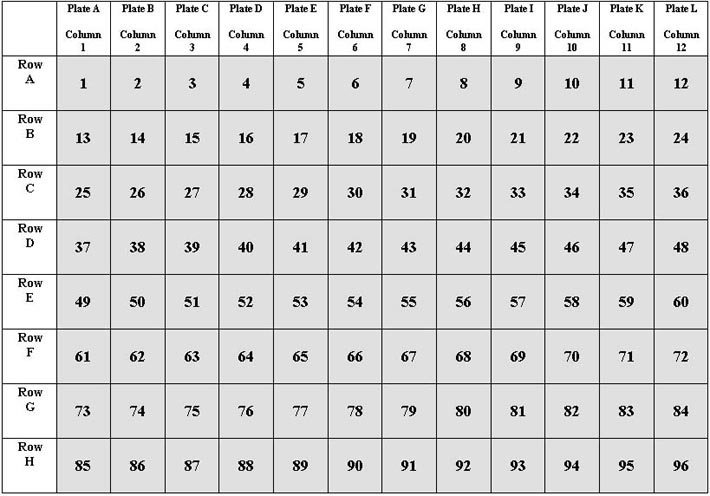
Because of the way the screening DNA is pooled, a column pool DNA well address identifies a particular plate and row of an individual DNA plate, and a row test is required to identify a single DNA well corresponding to a worm population. For example, assume an apparent deletion band on a screening gel identifies well 55 (refer to the 96-well grid). This well is at the intersection of Column 7 and Row E. Remember that according to the pooling scheme, Column 7 contains the pooled DNAs from individual plate G, and that Row E in plate G is still Row E in the column pool plate. Well 55 thus identifies Plate G, Row E. For the row test, DNA samples are taken in duplicate from Row E in both the pooled DNA and individual plate G, placed in wells of a 384-well plate and spun to the bottom. Appropriate master mixes are assembled and nested reactions performed as in the initial screen, and the products resolved on standard gels. A deletion band of the same size as on the screening gel should be seen in duplicate in the correct column position from the pooled DNA, and in duplicate in one of twelve columns of the individual DNA (providing a worm well address). This testing step can be expected to pass half or less of initial hits. Once a deletion has passed this test and identified a worm population, the population is sampled a second time (100 µl harvesting solution on, 25 µl off), placed into 25 µl Proteinase K buffer in a labeled PCR tube, strip tube or plate (depending on the number of populations being sampled at a time), frozen, cooked 1 hour at 65ºC, and inactivated at 95ºC for 20 minutes. Well test reactions (25 µl total volume) are assembled in 96-well PCR plates using 5 µl input DNA, in quadruplicate, in the following way: four 5-µl samples from the positive control (original individual DNA well), four samples of the digested resample, and four samples of a negative control (batch processed N2 DNA). Any resampled well that passes this test is recovered for sib selection. This step can be expected to pass half or less of things that passed the row test. | |
Sib Selection | |
| Once a well of worms is identified and confirmed, it is picked for sib selection. At this stage the library worm plates are completely starved, and depending on agarose concentration many of the worms may have burrowed below the surface. The goal is to recover as many worms as possible from the well, and set them up on new food at 1/10 of original density. If the worms are all on the agarose surface, they can be recovered by simply washing with M9 buffer and pelleting in a centrifuge. If they have burrowed, you can induce a lot of them to crawl out by flooding the well with about 2 ml of sterile M9 buffer and letting the plate sit overnight. It helps to make the buffer up to 0.01% Triton-X-100 (100 µl in 1 liter), which doesn't hurt the worms and keeps them from sticking to the plastic of tips and centrifuge tubes. In either procedure, transfer the worms to a 100 mm seeded agar or agarose plate and let them eat for a day or two. Then wash them off and make up to desired concentration in buffer, and dispense at 5/well to new plates (12- or 24-well untreated tissue culture plates with seeded agarose). We do everything in multiples of 96 if possible; it is usually sufficient to set up between 192 and 384 wells.
When the wells starve, harvest in the same way that library plates are harvested, cook the worms, inactivate the Proteinase K, and set up reactions. We label the plates in 96-well sets, as sib1A for 1-96, sib1B for 97-192, etc., and the reactions are done in 384-well plates. You may want to put in place some mechanism for keeping the sets straight. We have used different colored plates to differentiate, and lately we have been adding 10 µl of tartrazine loading buffer 100 µl of prepared DNA in some identifying pattern of wells before it is sampled for PCR (0.6 g tartrazine, 15% Ficoll, in water). The tartrazine doesn't interfere with the PCR, and enough will persist through two rounds of reactions to let you match internal reaction plates with particular plates of DNA. When positive wells are identified in sib1, we sample two of them as single worms for sib2, either on solid medium in 24-well plates or in 50 µl of 1% OP50 in 96-well untreated tissue culture plates. (If you do the latter, be sure to seal the plates in a plastic box with a damp paper towel to keep them from drying out. Also, please see the section on harvesting liquid-grown worms.) A total of 384 worms should suffice. Try to pick the worms blindly, without regard to phenotypes, and be sure to pick worms of a range of ages in case the deletion makes them grow more slowly. (We have been using a Copas 1000N worm sorter for single-worm sibbing, and with practice and experience it's not hard for one person to set up 384 wells for each of 6 to 10 lines in a day. There is quite a lot of collecting the waste stream, spinning the worms out, aspirating off the supernatant and return the worms to the sample cup on the sorter.) Once a deletion is down to single worms, it becomes a bit more labor-intensive as you have to decide whether the deletion homozygotes are lethal. Generally, you'll set up 24 single animals at sib3, let them lay eggs for a couple of days, then pick the mothers for single-worm PCR. Then 12 or 24 single progeny animals are picked for PCR at random from each of two to four positive wells to determine whether any of them are homozygous. If a deletion is persistently heterozygous, you'll have to balance it or just follow the arrest phenotype or the PCR phenotype. | |
Outcrossing and Balancing | |
| We have been evolving the final stages of sib selection gradually to include a standard outcross for every deletion using mapped pharyngeal muscle promoter GFP insertions, but we are not yet able to do this routinely. In this procedure, we do things differently starting at sib3. Instead of doing PCR on single mothers, we pick five to 10 progeny for PCR in a single well for each sib3 animal set up, and the mothers are transferred to wells of new plates so you can find them easily. Several mothers that are shown by this PCR progeny testing to carry the deletion are then mated to males carrying a GFP insertion nearby. Six to 12 GFP+ L4 progeny are set up individually from each cross plate and allowed to lay eggs for a couple of days, and the mothers are then PCR'd to see which ones carry the deletion. Several GFP– animals are picked from among the progeny of positive mothers to establish lines, and each line is checked by PCR to ensure that the deletion was not lost by recombination. If there are no GFP– progeny, it's a good bet that the homozygote is lethal. Most of our GFP insertion lines exhibit semi-dominant expression, so that animals homozygous for the GFP chromosome can be distinguished from those that carry only one copy, and the GFP can thus be used as a balancer. This works even better than you might think, because several of the GFP insertions are associated with recombination suppressors, and even simple insertions often suppress recombination locally over a few map units (Hodgkin et al., WBG 16:5 (20)). If you prefer to balance with a translocation, the GFP makes it easy to determine when you've isolated the deletion chromosome over the balancer. | |
Sequencing | |
| The final step of our protocol is to sequence deletion PCR products to find the breakpoints. This has proven to be very cost-effective, as our local sequencing facility is routinely producing sequencing reads of up to 1 kbp. We pool the internal PCR products from positive wells at the sib2 or sib3 level, purify 200 µl of the mix over a single column with a kit (usually Qiagen QIAquick or Sigma GenElute for PCR products), determine concentration by spectrophotometer (GeneQuant RNA/DNA Calculator, which uses only 5 µl of sample) and send for sequencing with one of the internal primers. If the deletion band is larger than 1kbp, we sometimes sequence from both ends to ensure that we find the breakpoints in the first attempt. | |
Last modified June 8, 2004