Using Monsanto Acceleron DC-309 fungicide for seed treatment in preparation for export

Greg Baute procured a small bottle of, what I believe to be, Monsanto-manufactured Acceleron DC-309 for fungicidal treatment of seeds in preparation for export.  It wasn’t labeled as Accelron, but did have a seed treatment label for a related chemical taped to the outside.  Based on Greg’s earlier emails and with this information, and Winnie’s confidence, I wrote “Acceleron” on the bottle in Sharpie.  It’s a small red bottle.  Should you need to use it, Winnie typed up the following protocol.  There are links to safety documents at the end of this post.  Be sure to wear Nitrile, not natural rubber, gloves.

How to apply fungicide to Greg Baute’s sunflower seeds


  1. Make sure you wear gloves!
  2. Take a falcon tube, a dropper, the fungicide and sunflower seeds to the fume hood
  3. Put sunflower seeds into the falcon tube (depending on the size of the seed, you might need to grab a 25mL/small one for small seeds or 50mL/large one for larger seeds)
  4. Use a dropper and put 3-4 drops of fungicide into the falcon tube and seal the lid
  5. It is now safe to bring the falcon tube with the fungicide and seeds out from the fume hood. Use the vortex to mix the fungicide and seed. Shake them for about 10-15 seconds.
  6. Return to the fume hood and open the lid, take seed out.
  7. Repeat for next package of seed

Have fun! But please be safe.

Chemical’s home page: http://www.acceleronsts.com/Corn/Pages/Resources.aspx

Seed treatment product label: http://www.acceleronsts.com/Corn/Documents/DC309.pdf

EPA Chemical Resistance Category Selection Chart: http://oeh.cals.cornell.edu/sites/oeh.cals.cornell.edu/files/shared/documents/pesticides/EPAChemRes.pdf

hand over documents

I’ve put together a folder containing information for anyone who may want to continue any of the projects I worked on. I’ve zipped it into a archive called “HandoverDocument_GBaute.zip” and it can be found on /moonriseNFS/ on a external harddrive that I am going to give to Loren and on a couple of thumb drives I am leaving in the lab (one is with my lab notebooks another is in the drawer by Winnies/Megans desk area). You will find information on the seeds, DNA and data used in my thesis and in a number of other projects.

hand emasculation of sunflowers

So you want to do some crosses without CMS or relying on self incompatibility? It takes some dedication but it can be done! This is how I carry out hand emasculations. There are hormone based options out there but they can need background specific protocols.

  1. Grow your plants.
  2. Bag the heads you want to use when there is 2-3cm between the last leaf and the head. Don’t bag too early and don’t bag too many leaves this will make the head grow crooked.
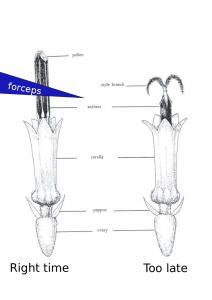
  3. Show up ~30 minutes after sunrise or when the greenhouse lights come on. There is variation here with the temperature effecting when the anthers come out of the florets. You can usually figure out the right time to come in a few days. If you show up to early you will only be able to see the very tips of the anthers as the come out of the corolla. These are very difficult to remove. Waiting 15-30 minutes will make a big difference. You will also notices some lines progress at different rates than others.
  4. Use a set of tweezers like these: http://www.aventools.com/avens-complete-product-line/tools/tweezers-and-quick-test-tweezers/precision-tweezers-1/e-z-pik-precision-tweezers/e-z-pik-tweezers-7-orange#.UzxaJ63c-d8 to remove that days new anthers. See figure for about where and when you should grab the anthers. You can grab a few at a time. You will notice as the morning progresses the pollen at the top of the anther will start to come out and fall all over the place. I find there is about a 1 hour window which is optimal.
  5. Use a good spray bottle set to a ‘jet’ spray (not mist) and spray down the head. This step is very essential.
  6. With the head wet inspect it for anther fragments either still in the corolla or fallen down in between florets. Repeat steps 4+5 as needed.
  7. Repeat steps 3-6 until the flower is done. I find this is about 1 week to ten days for a large cultivar head. If you don’t want to wait for the every floret you can use the forceps or a knife to remove the center florets.

anthers

Using LyX to format a thesis for UBC

I used LyX to format my thesis. I started using a set of files made available at the FOGS website. LyX is a “what you see is what you want” interface for Latex. Overall, I had a good experience using this program. There was only one formatting problem in the LyX files online which is now corrected. Other than that I the only things I had to address were errors of my own (too many words in the abstract for example). For sharing, I found it came out looking the nicest to export an HTML file, open it in a browser and then copy pasting it into word. This is a little tedious but I found it was an acceptable trade off given 1) the ease of use 2) how pretty it turned out and 3) the fact that word would have a complete meltdown with this many figures/tables/references. There are plugins for LyX which should allow more direct exporting.

Please let me know if you are able, or unable to use this. If you find and fix bugs please share!

Minimal_Functional_UBC_LyXThesis

Protip: put this folder in dropbox. Use relative paths to all of you figures (which you have put in the figures folder) as I have done in the example. This way you will should be able to generate the pdf from any computer with LyX and dropbox.


Link to user manual for new, old drying ovens in the Biosci lab.

There are two new-to-the-lab drying ovens in the Biosci lab.  They appear to be older.    They do not have digital displays of the inside temperature.  Neither do they have temperature settings on the dial.  Rather, they have dedicated glass thermometers and temperature settings 1-10.  I just installed a Hobo temperature logger, set to take readings every ten minutes.  I’ll adjust the settings over the next few days to try and get a bead on what those temperature setting numbers on the outside mean.

There is a link above to the drying-oven’s manual, but it is very basic and I didn’t find it to be much help.

September 9, 2015: Follow-up

Regarding the older-model drying ovens (from Velland’s lab).

Center temp reading:

Setting 1: 26 deg. C.

Setting 2: 51 deg. C.

Setting 3: 65 deg. C.

Note, there is a marked discrepancy between readings on the glass thermometers in the oven and the Hobo temp logger upon which the above information is based.  Glass thermometers appear to read a lower temperature than the Hobo logger, up to 10 degrees difference in some cases.  The Hobo used during this trial was new and factory- calibrated.  At least one of the glass thermometers appears to have bubbles in the metering liquid, so may be faulty.

Temperature setting 2: The temp logger was in the center of an empty oven with the vent partially open during readings.  When the vent (located on the top of the unit) was opened and both shelves were filled with damp samples the top shelf appeared to run about 10 degrees cooler than the bottom shelf (according to readings from the glass thermometers).     Filled with damp samples and with the vent fully opened, average temperature for the top shelf was 33 deg. C.  And according to the glass thermometer, the temperature on the bottom shelf was about 43 degrees.  It may be worth noting that these readings were taken from glass thermometers laying directly on metal shelves, whereas the samples themselves were elevated off the metal shelves, somewhat, by their stems and sepals/calyx, and so likely insulated from any quick fluctuations by these things, as they would have been by the surrounding air and enclosing plastic bags.  At the last measurement, bottom shelf samples were warm, but not hot, to the touch.  Also, there was a vigorously living spider moving about in one of the bottom shelf bags.


How to use FTP (good for uploading data to the SRA)

So you have done everything described in my earlier post about uploading data to the SRA and have received ftp instructions. It is pretty straight forward if you have experience in bash/shell. First navigate into the directory all of your data is in. They type:

 ftp ftp-private.ncbi.nlm.nih.gov

Or whatever you target site is. You will be prompted to enter the supplied username and password. From here, the unix commands ‘cd’ ‘ls’ and ‘mkdir’ all work just as on our other machines. You can make a new directory for your data or just dump it where you are (there are no instructions otherwise). To upload one file use ‘put’.

 put Myfile1.txt

To a bunch, you should first turn off the prompt and then use mput with a wild card.

 
prompt
mput MyFile*txt

Check it is all there with ls and leave.

exit

Bibtex library

Even the smartest reference software needs some hand editing help. Here is the bibtex file I used for my thesis. At least the ~200 papers I cite in my thesis are correct. It could be a useful starting point for anyone using a reference manager. The best way to add papers is to find it in google scholar, click cite, click bibtext. Then copy and paste it into this file which you have opened in a plain text editor.

Here it is (you may need to remove the .txt):

GB_Bibtex_ReferenceLibrary.bib